STUMPY
Comparing time series data like a pro
Mihalis Tsoukalos explains how to use the Stumpy library to compare time series, with a little help from Anaconda.
OUR EXPERT
Mihalis Tsoukalos is a systems engineer and a technical writer. He’s also the author of Go Systems Programming and Mastering Go. You can reach him at www. mtsoukalos.eu and @mactsouk.
T this month’s coding tutorial will concentrate on Stumpy .This is a Python 3 library for working with time series data, which also uses the matrix profile. The matrix profile together with MPdist are research subjects that are being applied to real world problems. Although it’s good to know how they work, you don’t need to know the theory to use them. If some of the topics in this tutorial look too theoretical, feel free to skip them! This tutorial also includes a quick introduction to Anaconda, which comes in very handy for setting up the Python environment when working with Stumpy.
Anaconda management
Because Stumpy has close ties with the Python version being used, we’re going to use Anaconda to create the ideal development environment and gain complete control over the installation process. This requires the installation of Anaconda, which operates using the conda command line utility.
If the conda binary can’t be found in the PATH environment variable, you should run source /opt/ anaconda/bin/activate root . Feel free to add this command to the startup file of your shell to ensure that it’s executed automatically each time you log in. To create a new Anaconda environment called LXFormat that uses Python 3.8.5, just run the following command: $ conda create --name LXFormat python=3.8.5
Then run conda activate LXFormat to activate this environment. If you want to deactivate an active environment, run conda deactivate . If you want to totally deactivate Anaconda and work with the default Python installation found on your Linux system, you might need to run conda deactivate multiple times, depending on the number of the conda activate commands that were previously executed.
Now that the LXFormat environment is active, we’re ready to install the Stumpy library using the pip command: pip install stumpy . Although the library is installed using pip , it’s still controlled by Anaconda. The following code, which is called helloStumpy.py, makes sure that Stumpy is properly installed by printing its current version:
#!/usr/bin/env python3
import stumpy
print(stumpy.__version__)
print("Good to go!")
Running helloStumpy.pyprints the following output:
1.8.0
Good to go!
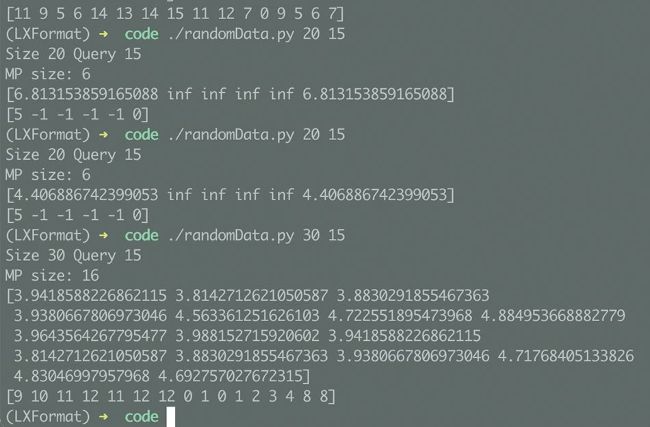
Here’s the output of the
randomData.py script that generates a time series with random data and calculates its Matrix Profile.
This means that Stumpy was successfully installed and that we’re using Stumpy version 1.8.0. Stumpy contains functions related to Matrix Profile and its applications. Two of these functions enable us to calculate the Matrix Profile and the MPdist metric – the names of these functions are stumpy.stump() and stumpy.mpdist() , respectively. So, let’s move onto generating random data with the Stumpy package and calculating the Matrix Profile.