SIMULATE SMALL-SCALE LIQUIDS IN BIFROST
Utilise Bifrost’s powerful tools to create realistic small-scale liquid simulations in Maya
Holly Watt
Holly Watt Holly has eight years of experience as a freelance VFX artist, and is a lecturer at the University of Lincoln. instagram.com/hollywattvfx
This tutorial will guide you step-by-step through the workflow of utilising Bifrost’s powerful tools to create a small-scale simulated liquid. Bifrost is well known for its use in creating large-scale simulations and it can often be overlooked when it comes to smaller, more detailed simulations.
The tutorial is aimed at complete beginners to Bifrost as well as those who have previously used it before for large-scale simulations. Bifrost is heavily dependent on the scene, so there is a focus on scale throughout the tutorial beginning with how to set up your scene to scale ready to add Bifrost emitters, colliders and killplanes. The next steps cover how to alter settings needed to convert Bifrost from using a metre scale to a cm scale. You will then go on to learn how to create a viscous honey liquid simulation, how to cache your simulation and finally mesh it to turn it from particles to geometry. The final steps cover adding your shaders and lighting to create a simple but striking final image.
Once you’ve completed this tutorial you will have created a detailed, realistic simulation of honey and will have a thorough understanding of the Bifrost workflow, able to apply your new knowledge to create other small-scale liquid simulations.
01 MODEL YOUR SCENE TO SCALE
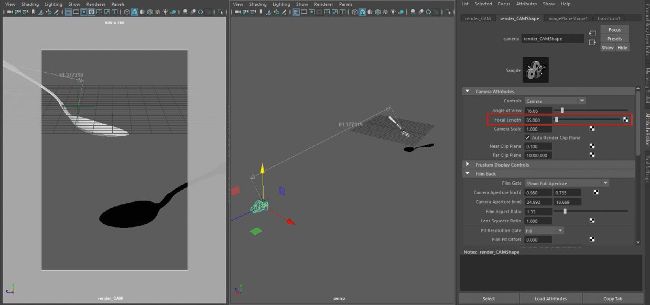
Bifrost relies on accurate scale to create realistic simulations, so you need to make sure the scale of your geometry that the liquid interacts with is correct. Research the dimensions of your objects in real life; product listings on online stores is a good place to find accurate dimensions. A teaspoon is approximately 11cm in length, so working with a scale of 1 Maya unit equals 1cm, scale your image planes to 11 units for the length before you begin modelling. If you choose to download a free 3D model be sure to scale it to 11 units in length.
DOWNLOAD YOUR RESOURCES For all the assets you need go to https://bit.ly/3DW-mandalorian
02 LAYOUT THE SCENE
Now that you have your spoon geometry modelled to the correct scale, you can layout your scene. Duplicate your spoon so that you have at least two and position them one above the other. The liquid will drip from above the camera view onto the top spoon and fill it before dripping to the next. Add some variation to the rotations of each spoon to allow the liquid to have some interesting movement when it is time to simulate; you can always tweak the positioning later.
Distance tools in Maya Maya has measuring tools found in its Create menu, which can be useful for getting instant feedback to easily check distances in your scenes.