Build a “rubber ducky” device from a Pi Pico
Discover why the classic fake keyboard hacking device is ideal for the Raspberry Pi Pico and Matthew Holder’s very particular set of skills…
OUR EXPERT
Matt Holder has worked in IT support for over a decade. As a longtime open source fan, he’s always tried to utilise Linux alongside other systems.
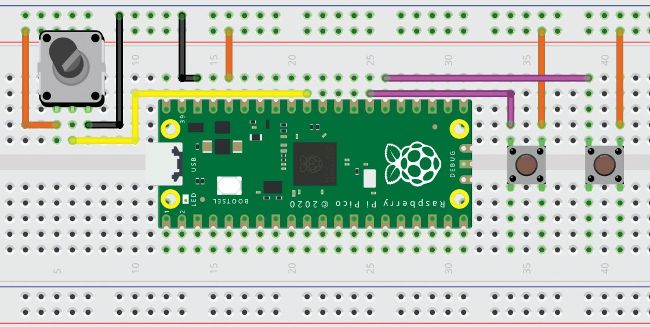
Here’s the circuit diagram for both projects. See the left-hand side for the LED project and right hand side for the rubber ducky.
Let’s have some fun with the Raspberry Pi Pico. We’re going to try a couple of basic projects L and we’ll discuss how to install different types of firmware on the board, write a program to flash an LED and then discuss the configuration required to set up a board as a so-called rubber ducky device. We’ll configure our rubber ducky to enter simple keypresses.
During this tutorial, we will discuss how to install different types of firmware on the board. Examples of firmware are micropython, CircuitPython, C/C++ and the Arduino language and programming tools. Following firmware installation, we’ll write a program to flash an LED and then discuss the configuration required to set up our board as a rubber-ducky, style of device. In this example, we will configure the rubber-ducky to enter simple keypresses. With a little more imagination, it would also be possible to configure a device to operate in a similar manner to the streamdeck shortcut devices.