iPhone Holiday Photo Superguide
Written by George Cairns
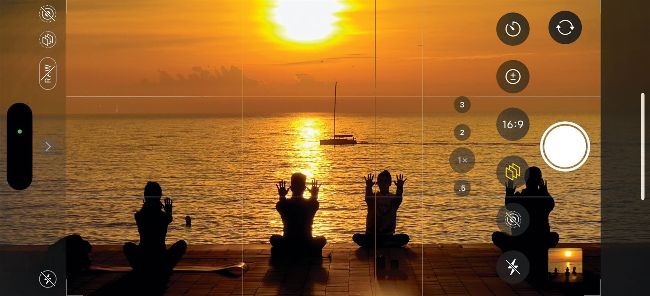
Image credit: Apple Inc
Take amazing holiday photos on iPhone – we show you how
With summer holiday season fast approaching, we’ll all hopefully have a bit more leisure time to take some photos. Holiday destinations provide fantastic photo opportunities that should inspire you to swipe to your iPhone’s Camera app and capture pictures of your family and friends enjoying amazing architecture, beautiful beaches and exotic food. In this in-depth photography feature, we’ll show you how to set up and use your iPhone camera to make the most of both a little jaunt to somewhere local or a more far-flung destination, so that you can populate your WhatsApp groups (or social media feeds) with stunning vacation shots.
We’ll also give you tips and techniques on making your holiday snaps look their best in relation to quality and composition, so that your shots stand out from the crowd. We’ll show you how to capture perfect panoramic landscapes and explain how to produce more creative selfies that capture more of you and your holiday location than the usual arm’s length self-portrait (without the need of a tripod or selfie-stick).
We’ll show you how to edit your shots on the go in the iOS Photos app to make the most of your destination’s eye-catching hotspots. Editing images also helps you counteract problems with composition (such as a tilted horizon). You can then share your processed pictures while you’re still on holidaying so that other people can join in your fun.
The annotated iPhone screen (above) shows the extra Camera app tools you can access when you swipe left (when the iPhone is held in landscape orientation); they can also be accessed by tapping the chevron icon. Tools such as Filters and Photographic Styles also enable you to give your photos a specific look in relation to colour and tone without having to edit them – making it easier for you to shoot and share more quickly. We used an iPhone 13 and 14 Pro Max for most of this feature’s shots but you’ll find that many of our tips and techniques can be used on other iPhone models.
Get more from the Camera app
1
Chevron
By default, the Camera app displays shooting modes such as Video, Photo, Pano and Portrait. Tap here to access extra tools that control the way the Camera app behaves (such as the Timer, Filters and Photographic Styles).
2
Outside frame
In Settings, go to Camera > Composition. Toggle on the ‘View Outside the Frame’ option. You’ll now see semi-transparent image areas at either side of the frame. This helps you recompose the shot to capture important details.
3
Styles
Tap here to choose a Photographic Style to apply to each image as soon as it is snapped. Styles such as Vibrant or Rich Contrast let you capture a specific look without the need to edit each shot’s colours and tones later.