16GB OR LARGER USB FLASH DRIVE Ventoy (www.ventoy.net) and a selection of rescue media in ISO file format.
A
ONE RESCUE DISK TO RULE THEM ALL. That’s the stated aim of this tutorial, and thanks to a free tool called Ventoy, that goal is not just reachable, it’s simple to achieve, too. All you need is a suitably large USB flash drive—16GB or larger—and after installing Ventoy on it, you can simply copy across all kinds of bootable media as ISO files directly to the drive, then choose which one to boot from when you restart your PC.
Whether you need to restore your last drive image to bring Windows back to life, perform surgery on a non-booting Windows install, clear malware, or recover data from a corrupt drive before wiping it and starting again, your one-size-fits-all rescue disk will have you covered.
In this tutoial, we’ll step you through the trickiest part of the process: installing Ventoy to your flash drive before configuring your Secure Boot-enabled PC to allow you to boot from it, then reveal some of the rescue media out there you need to ensure you’ve covered all your bases. While you’re at it, why not chuck on some Linux live distros, too? Whatever your bootable media needs, Ventoy truly has you covered.
–NICK PEERS
1INSTALL VENTOY
Ventoy doesn’t require installation—you can download the latest version from its home page (https://ventoy. net/en/download.html) in one of two forms: as a standalone app packaged as a Windows zip file (right-click this and choose Extract All, then extract it to the same directory you downloaded it to), or as a Live CD (ISO) for those rare occasions when Ventoy is unable to write to your USB flash drive. There’s also a build for Linux users.
» You can also install Ventoy in Windows via the PortableApps. com launcher—simply launch PortableApps Platform and choose ‘Apps > Get More Apps > By Category’. You’ll find Ventoy under Utilities, and the advantage of installing it through PortableApps.com is that it updates automatically.
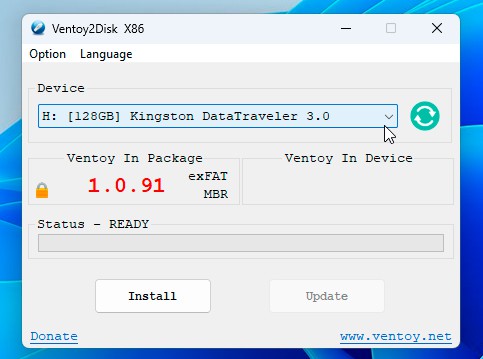
» Once extracted or installed, plug in your USB flash drive and launch Ventoy (double-click Ventoy2Disk.exe if you downloaded it directly from the Ventoy website). After clicking Yes to grant Ventoy the necessary administrator privileges, the main screen should open as shown in [Image A].

B
2CREATE VENTOY BOOT DISK
Make sure your flash drive is selected under Device (click the ˇ button to switch to it if a different drive is shown), then examine the ‘Ventoy in Package’ section. This tells you the current version, plus the partition layout (MBR) and file system (exFAT) for the Ventoy boot partition.
» Ventoy works by creating two partitions: a small hidden boot partition that loads it at startup, and then a larger partition into which you copy all your ISO files. We’ve had no problems using exFAT as the boot partition, so recommend that setting remains as it is. However, the MBR partition table is better suited to older BIOSes, so it’s likely you’ll need to switch to GPT mode.
» Before doing so, press Win + Rto bring up the Run dialog, type msinfo32 and hit Enter to open System Information. Under System Summary, check to see what BIOS Mode is set to—if it’s UEFI, then you’ll need to set your partition layout to GPT. While you’re here, also check Secure Boot Start status to see if it’s enabled on your machine.
» Return to the main Ventoy screen and open the Option menu. You’ll see that ‘Secure Boot Support’ is checked by default—if your PC isn’t protected by Secure Boot, you can uncheck this and save some extra legwork later. Next, open the Partition Style submenu and change it to GPT if required. Ignore the other options for now and return to the main screen.
» All that’s left to do at this point is click the Install button, read the warning, and click Yes twice. This is a destructive process—there is a ‘Non-destructive Installation’ option in the main Options menu should you wish to preserve existing data on the drive, but it won’t work if you’re intending to switch between MBR and GPT, or if the existing partition isn’t NTFS (see www.ventoy.net/en/doc_non_destructive.htmlfor a full list of conditions and potential workarounds—none of which are a substitute for copying the files off the drive, then copying them back on later if necessary, as any files can be stored on the drive alongside your ISO images).

© MSI, VENTOY
THE VENTOY TOUR
1. SELECT YOUR RESCUE DISK
All ISO files copied to your Ventoy flash drive will be here. Make your selection, then hit Enter to boot from that ISO file.
2. BROWSE
Press F2 to browse the contents of all locally attached hard drives from Ventoy—you can also boot directly from any ISO files you find on these drives too.
3. TREEVIEW
As your ISO file collection builds, consider organizing them into folders, then switch to TreeView to make them easier to find by browsing to a folder.
4. LOCALBOOT
Pressing F4 will exit Ventoy and boot from the first available hard disk on your system—typically your Windows drive— to return you to your desktop.
5. TOOLS
Access a range of useful features, such as Power (reboot or halt), or Temporary Control Settings, which includes an option to bypass CPU, TPM and SecureBoot checks to allow installation of Windows 11 on incompatible hardware.
6. EXMENU
This is a customizable grub2 menu you can fill with your own choice of grub2 commands—for example, options to boot directly to Windows or another installed OS. See www.ventoy.net/en/ plugin_grubmenu.html for details.
3ADD YOUR FIRST ISO FILE
Once Ventoy has installed itself to the flash drive, click OK to return to the main screen, where you should see the ‘Ventoy in Package’ and ‘Ventoy in Device’ fields now match. Whenever Ventoy releases an update, you can download and run the new version, verify that the ‘Ventoy in Package’ is newer than the version on your device, then click Update to update your flash drive without losing data. Updates add support for new ISO files as well as introduce features and squash bugs, but unless you have a particular issue, there’s no need to update regularly.
» One final step: you need to test your bootable USB drive. To do so, you first need to copy your first bootable ISO file to it. Let’s start with your drive imaging tool’s rescue disk. This will enable you to restore the last system backup you took in the event of your PC failing to boot, transforming what might have been an unmitigated disaster into little more than a minor irritant.
» Those still running Macrium Reflect should open the program and choose ‘Other Tasks > Create Rescue Media’. Make sure ISO File is selected, make a note of where the resulting file is saved (your downloads folder by default) and click Build to create the required files. Once created, click Close and copy the MacriumRescue. ISO file to your flash drive.
» Hasleo Backup Suite users should navigate to Tools and select Emergency Disk. Add any drivers you need or click Skip to build the emergency disk. Once it’s in place, leave ‘Export ISO’ selected and click the folder button to set a destination and filename before clicking Proceed. Again, once finished, copy the file to your flash drive.

» Test Ventoy in a virtual QEMU environment.
TEST WITHOUT REBOOTING
Rebooting your PC every time you want to test your Ventoy boot drive can be frustrating. While looking for a means to capture grabs of Ventoy, we stumbled on a quick way to test bootable USB drives—including Ventoy—in a virtual environment.
Head to https://qemu.weilnetz.de/w64/ to download the latest Windows 64-bit installer of QEMU—at the time of writing it was dated 2022-12-30. During installation, leave all options checked. Once it’s in place, head to https://github.com/mbusb/ multibootusb and click on Releases to obtain the last release (9.2.0) of MultiBootUSB (multibootusb-9.2.0-setup.exe).
Once installed, launch MultiBootUSB and verify that your Ventoy drive letter has been selected. Now, switch to the Boot ISO/USB tab and simply click ‘Boot USB’—after a short pause a virtual window will open inside which Ventoy will launch. There may be a bit of screen corruption on the main menu, but it’s still perfectly readable, and you’ll be able to test away.
We still recommend testing Ventoy in a real environment— that’s because many disks (like Ubuntu and Windows) won’t load successfully in this basic environment, but also because it’s a good idea to make sure the tools you’ve added work well with your system and hardware.
4TEST YOUR FLASH DRIVE
The moment of truth: it’s time to test the drive. The box reveals a technique that allows you to test Ventoy in a virtual environment, but while that’s useful when it comes to experimenting with settings, it’s vital you test the drive on your actual PC, so you know you’ll be able to rely on it should you need it.
» With the drive plugged in, restart your PC and look for the option on startup to either select the boot drive or—if it’s not on offer—to enter the UEFI to look for a boot override option as shown in [Image B]. When your PC’s boot manager appears, select your flash drive from the list—if two options are presented, pick whichever type (UEFI or MBR) matches the choice you made in step two.
» If your PC is set to Fast Boot, it’s possible you won’t see any option to select the boot drive during startup. In these circumstances, open Settings, navigate to System > Recovery and click Restart Now next to Advanced Startup. When your PC reboots, select ‘Use a device’ and select your USB flash drive from the list to boot from it.
» If Secure Boot is enabled, you will be presented with a blue error screen telling you that ‘Verification failed (0x1A) Security Violation’. Hit Enter and press any key when prompted to perform MOK management. Select ‘Enroll key from disk’ and hit Enter. Select VTOYEFI and hit Enter, then select ENROLL_THIS_KEY_IN_MOKMANAGER.cer and hit Enter again. Choose Continue, followed by Yes, and then Reboot. When you next boot to the flash drive, you should see the main Ventoy screen appear.
» Note: you must perform MOK enrolment on each new PC that has Secure Boot enabled the first time you introduce your Ventoy rescue disk to it. However, it’s a one-time only procedure for each PC—going forward, even if you recreate Ventoy on another drive, you won’t need to re-enrol any MOK keys.
» If for any reason you’re unable to enrol the key—you may find that your PC appears to freeze at this point—simply reset your PC. You should boot straight back into Windows. If you’re unable to get the Ventoy boot disk to work with Secure Boot for any reason, recreate it with ‘Secure Boot Support’ disabled, then manually disable Secure Boot in your system UEFI/BIOS each time you need to boot from the disk.
5BOOT FROM YOUR RESCUE DISK
By default, the main Ventoy screen displays a list of all ISO files placed on it. Selecting one is as simple as using the arrow keys followed by Enter— in this initial circumstance, only one option (Macrium or Hasleo) will be highlighted, so simply press Enter.
» Ventoy will now boot from this ISO as if you’d burned it to disc (or copied it to a standalone flash drive). With other bootable rescue media, you may be offered a secondary boot menu—for example, the Windows installation media offers to boot in normal or wimboot mode —in which case start with the normal option and then try various fallback options (Ubuntu offers a ‘safe graphical mode’, for example) if you’re unable to get it to boot any other way.
» Once your chosen rescue environment has loaded, you should be able to use it in the same way as when booting from the rescue disk. If you run into specific problems—for example, it can’t detect certain drives or you’re unable to establish a wireless connection, you’ll need to return to Windows and see if you’re able to diagnose the problem. In many cases, you may need to provide additional drivers from your own PC setup to ensure the rescue media in question has access to the hardware it needs.

C
© MICROSOFT
6ADD BOOTABLE INSTALLATION MEDIA
Next, we recommend downloading the latest version of the Windows installation disc, again in ISO format. Direct links are provided for both Windows 11 (www.microsoft. com/software-download/windows11) and Windows 10 (www. microsoft.com/software-download/windows10ISO). In both cases, a single ISO file is provided via the dropdown menu: it’s a multi-edition version that covers Home, Pro and other versions.
» Once downloaded, copy this file to your Ventoy boot disk (or both if you have machines running a mixture of Windows 10 and 11)—the Windows installation media doesn’t just allow you to reinstall Windows from scratch, it also you access to Windows’ repair tools, like Startup Repair and System Restore as shown in [Image C], which may help you recover your system after a crash.
» Now’s also a good time to download and copy Linux installation media to your flash drive. We recommend choosing Ubuntu 22.04 LTS (https://ubuntu.com/download/desktop), as it can be run as a ‘live’ desktop environment directly from the flash drive. This gives you access to a desktop to access drives (to copy files off), access the internet, and more besides.
7ADD MORE RESCUE TOOLS
Next, head over to www.lazesoft.comto download and install Lazesoft Recovery Suite Home Edition, which is completely free for personal use. The tool offers four main components, two of which stand out. The first is Windows Recovery, which offers a wider range of tools for repairing errors that cause Windows to crash or prevent it from booting correctly. The second, Data Recovery (which can also be launched from Windows), provides you with various options for recovering files from drives—including those that have gone missing, become corrupt or simply accidentally formatted.
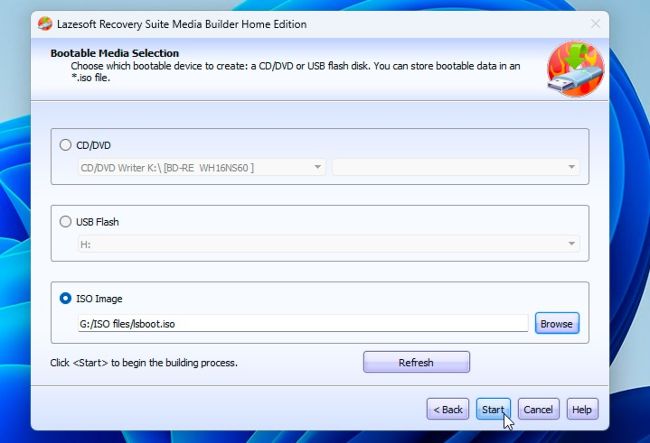
» After installing Lazesoft, launch the program and click ‘Burn CD/USB Disk’ to open the Bootable Media Builder. Leave ‘Same as this computer’ selected as the Windows version, but only click Options > Add WinPE Drivers tab if you need to add specific SATA or RAID drivers to detect your hard drives—unlikely on most machines. Click Next, then select ISO Image and choose a convenient location to store the lsboot.iso file on your hard drive as shown in [Image D] before clicking Start. Again, once the ISO file is created, copy it across to your Ventoy boot drive.
D
© LAZESOFT
8THWART MALWAR
E Many antivirus vendors offer emergency rescue media—ISO files that become bootable disks to scan compromised systems for forms of malware and remove them. Some vendors—like Avast—require you to create the media from within the program itself, while others, like Bitdefender and Windows Defender, can only be launched from within Windows, rebooting to their own rescue environment when requested or unable to clean the infection through normal means.
» Others, however, still provide bootable media for use outside Windows, which you can add to your Ventoy rescue kit. They include the Norton Bootable Recovery Tool (https://support.norton.com/sp/static/external/tools/nbrt.html), ESET SysRescue Live (www.eset. com/int/support/sysrescue/), and Panda Cloud Cleaner (www.pandasecurity.com/en/support/card?id=1681). Choose the DVD or ISO version rather than the USB.
» Congratulations, you’ve just built your bulletproof rescue disk—but don’t stop there, as you’ll find lot of useful rescue media online, including the renowned Hiren’s Boot CD (www.hirensbootcd.org), which bundles numerous repair and recovery tools in a single ISO file that boots to a Windows-friendly desktop.

» Ventoy’s settings are held in plugins, all of which are editable.
CUSTOMIZE THE VENTOY BOOT MENU
If your boot menu starts to become crowded, there are several ways to make things easier to navigate. The simplest is to rename the boot files so they’re more identifiable (for example, Norton Bootable Recovery Tool.iso rather than nbrt.iso).
Another tip is to group related ISOs together into folders, such as Security or OSes. By default, the Ventoy boot menu will continue to display these in alphabetical order, but if you press F3, you’ll switch to TreeView, which as you’d expect, displays folders as well as files.
If you’d like to customize things further, you’ll need to familiarize yourself with what Ventoy calls plugins, but which are in reality a series of text-based .json files. Thankfully, editing these doesn’t involve your text editor—simply launch VentoyPlugsOn.exe from the same directory as Ventoy (or VentoyPortable\App\Ventoy in the PortableApps version), and it’ll load a web page with access to all the tweaks you could possibly need. Visit https://ventoy.net/en/plugin_entry.html for a complete guide. One tweak to make TreeView the default view is to set VTOY_DEFAULT_MENU_MODE to 1 under ‘Global Control Plugin’. You’ll see Ventoy Plugson updates Ventoy in real time, so you can immediately test your tweaks using MultiBootUSB. Don’t forget to click Stop in VentoyPlugson when you’re done.