UBUNTU
Build a fully featured Ubuntu NAS system
Nick Peers takes a generous portion of Ubuntu Server, adds a dash of Cockpit and whips up a tasty network-attached storage setup,
Credit: https://www.ubuntu.com
OUR EXPERT
Nick Peers is available for Captain Riker impersonation gigs and freelance writing.
Y our NAS server needs a suitable operating system to run, and because it’s designed to be run headless, we’re going to install Ubuntu Server 20.04 LTS. The Server version doesn’t come with unnecessary system overheads such as a desktop, because everything is done from the command line.
Don’t worry, though: after it’s been set up, we’ll install a special add-on (Cockpit) that enables you to easily administer your server remotely from any web browser on your local network. We chose the LTS version of Ubuntu Server to reduce the number of major OS upgrades that we’ll need to apply during the server’s lifetime.
Start the install process
Head over to www.ubuntu.com/download and click the Ubuntu Server link, followed by Option 2 – Manual server installation. You should find the latest LTS version (Ubuntu Server 20.04.2 at the time of writing) as the main option. It’s a much smaller download than the fullblown desktop version and comes in at a mere 1.1GB. Once Ubuntu Server has downloaded, you can burn it to a blank DVD or copy it to an unused USB flash drive (2GB or larger).
Ubuntu Server’s text-based install wizard is simple enough to use.
Once you’ve created your install media, plug it (or insert the disc) into your server PC before powering it on. If the BIOS isn’t configured to boot from USB drives, press F11 (possibly F12) on startup to bring up the boot menu, then select your USB drive to start the install process. If you’re familiar with the Ubuntu Desktop install process then prepare to forget everything (albeit temporarily!) because Ubuntu Server uses a text-based install method.
When the GRUB menu appears, leave Install Ubuntu Server selected, and press Enter. You’ll see some familiar command-line messages scroll by as your drive is tested for errors and key steps are performed. Eventually, you’ll be shown the text-based setup menu. It’s not as attractive as Ubuntu Desktop, but still relatively simple to navigate.
Set up your system
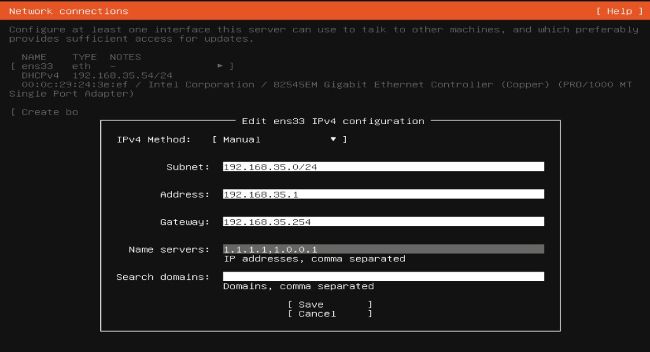
Select your preferred language and hit Enter, then choose your keyboard language and layout. The next step is potentially the trickiest, because it involves configuring your network. Servers should be given static IP addresses, which enables them to be easily found on the network. Start by pressing the up arrow key twice to select the current interface (ETH or WLAN) and press Enter. Use the down arrow key to select Edit IPv4, hit Enter, then hit Enter again to change the setting from Automatic (DHCP) to Manual.