Inside Linux
Virtual this, that & the other
Matt Holder delves deeper into the kernel to discover virtualisation, containerisation and virtual filesystems.

CREDIT: Magictorch
Part Two! Don’t miss next issue, subscribe on page 16!
In this part of our Inside Linux series, we are looking at more of the features our kernel offers and introducing virtual filesystems and hardware detection. Last month, we covered the basics of the Linux kernel, what it does and how it makes our lives a lot easier by providing interfaces between userspace applications and the hardware itself. As we discovered, the kernel is made of multiple subsystems, each of which is split into a number of layers. This time, we are looking at the virtual filesystem layer of the storage subsystem.
Your Linux distribution follows the concept that ‘everything is a file’. This means that pictures, documents, movies, directories, writing to hardware and reading from hardware are all abstracted into filesystem operations. For example, sending data to or reading data from a serial port is done by referencing a file in a certain part of the filesystem.
Virtual first
First arriving in 2007, Kernel-based Virtual Machine (KVM) allows the kernel to function as a virtualisation hypervisor. KVM emulates a virtual CPU and memory, and has support for VirtIO. Tools such as Qemu are then used to provide the emulation of some of the other hardware devices as well as using VirtIO, which is a standard for the communication between the virtual machine and hypervisor to allow for high-performance networking and disk operations. Drivers are available for Windows guests as well as Linux support being widespread. We will now turn our Ubuntu installation into a hypervisor and use Cockpit to control it.
To set up your Ubuntu installation as a hypervisor, open a terminal and enter the following commands:
$ sudo apt install bridge-utils cpu-checker libvirtclients libvirt-daemon qemu qemu-kvm $ sudo apt install cockpit cockpit-machines
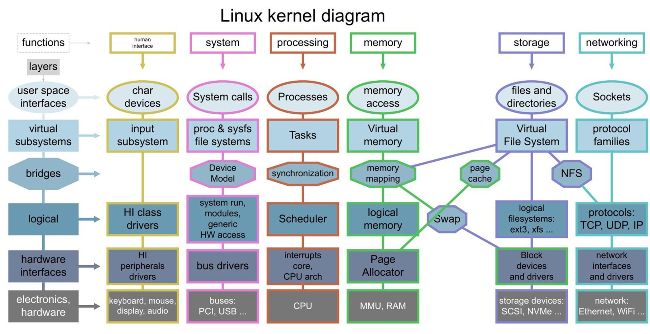
The kernel is made from multiple subsystems and each one is made up of multiple layers.
The first command installs the necessary tools to run virtual machines and the second installs Cockpit, which can be used to set up and use virtual machines.
Once installed, open your web browser, navigate to https://127.0.0.1:9090 and use your username and password to log in to Cockpit. Spend some time learning about the tasks you can accomplish, such as adding users and performing upgrades. Select the Virtual Machines menu on the left-hand side and use the displayed option to create a new VM.