BLENDER
21 EXPERT BLENDER TIPS AND TRICKS
Artists from Blender Studio have compiled a collection of expert tips and advice to help you boost your Blender skills and knowledge

01
02

03
Blender’s node-based shader editor has the potential for a very powerful and customisable workflow when you know your way around it. It allows you to use multiple different techniques to layer and blend materials and set up dynamic relations between parameters and properties. Some of these techniques are straightforward and directly exposed in the interface, but for others you have to know just the right buttons to press.
This set of tips is a collection of tricks and good practices touching on different parts of the shading pipeline to enable a more flexible and procedural workflow.
01
NODE WRANGLER
If you are using Blender’s shader editor, you should activate the Node Wrangler addon. It makes your workflow much more efficient with things like a preview node and a Lazy Connect feature. You can enable it in the Preferences under the Add-ons tab.
Simon Thommes
02
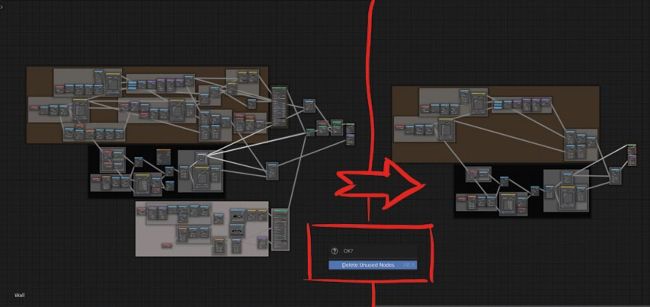
DELETE ANY UNUSED NODES
To clean up your node tree visually you can simply press Ctrl+X. This seeks out all the nodes that are not contributing to the output at all and removes them from the graph.
Simon Thommes
03
MULTIPLE UV LAYERS
To get individual control over the alignment of different texture elements on your asset, you can create multiple UV layers. Usually you want at least one without any overlapping for baking and texture painting, but for procedural elements it can be incredibly useful to have additional maps to align patterns and shapes.
Here I am using a UV layer to align seams on Ellie’s jacket that are generated by a procedural texture. The helpful benefit of this is that I can change the seams separately from the jacket at any point.
Simon Thommes
04
COORDINATE WARPING
You can manipulate coordinate maps like UV maps
before plugging them into a texture
node. For example, you can warp
the coordinate space of a texture
using a colour noise. The easiest
way to do this is using a MixRGB
node set to Linear Light to shift the
coordinate vectors of the map with
that noise. This way you can easily
add additional interest to patterns,
noise textures or even hand-painted
image textures. By tweaking the
noise properties and the strength of
the warp you can adjust the effect.