BUILD YOUR OWN CLOUD STORAGE
Don’t trust third parties with your data? Nick Peers has the answer…

© MAGICTORCH
IN THESE DAYS
of password breaches and encroaching government agencies, how much do you trust any third party with your data? Cloud storage is baked into Windows with Microsoft’s OneDrive, but despite the generous 1TB of storage space with any subscription, how sure can you be that your data is truly beyond the reach of bad actors?
If you’d rather not trust the internet with your precious data, Nextcloud Hub is the solution for you. It offers the same features you find in any good cloud storage solution— backup and synchronization between all your devices—but goes further to add a secure self-hosted chat platform as well as private solutions for your contacts, calendar, and projects, all of which can be accessed on your phone as well as your desktop and laptop. There’s even a powerful web-based office suite—based on LibreOffice—that you can deploy to edit documents on the go.
Better still, you can sign up trusted friends and family to free accounts to give them access to your server, providing you with all the tools you need to chat, share, and collaborate on projects without worrying about who might be snooping on your data. It’s time to free your data from the tyranny of others. It’s time for Nextcloud.
BEFORE YOU BEGIN,
you need a suitable server to host Nextcloud on. Our small server build from the September 2022 issue is perfect, but you can use any Windows, Linux, or macOS computer running Docker. For the purposes of this feature, though, we’ll assume you’re running Ubuntu Server on a headless small PC, accessed remotely through the Cockpit interface in your PC’s web browser. This means you can copy and paste commands from your text editor directly into Cockpit’s terminal, which saves no end of time.
We’re also going to assume you plan to access Nextcloud from outside your network, so you need a suitable domain or subdomain to point to your home’s public IP address. Use the ddclient container (https://docs.linuxserver.io/images/docker-ddclient) to ensure it keeps pointing home even when your public IP address changes, and use Nginx Proxy Manager (https://nginxproxymanager.com), which we featured on page 62 of the April 2023 issue, to set up a reverse proxy.
We’ve opted for the official Nextcloud AIO Docker container, too, which downloads and installs all required containers—as many as 13 depending on the components you choose.
Instructions for installing Nextcloud AIO are at https://github. com/nextcloud/all-in-one—ignore the standard setup and click the “Reverse-proxy.md” link for instructions. Configure your reverse proxy by expanding the Nginx-Proxy-Manager section.
Install Nextcloud
Now switch your attention to Nextcloud AIO. Copy and paste the code under “Use This Startup Command” into your text editor. As things stand, this code won’t work. We need to add two lines, so the full instructions can be seen in the screenshot above.
You need to change “--net=bridge-for-all-seasons” to point to the same bridge network your reverse proxy is on, then point NEXTCLOUD_DATADIR to the path where you plan to store your synched files and other Nextcloud data. You probably also have to remap port 8080 if it’s in use elsewhere on your server— for example “-p 8081:8080” or something similar.
Now save the text file, copy it all to the clipboard, switch to Cockpit’s terminal, press Shift-Insert to paste the code in, and hit Enter. If all is well, Nextcloud AIO is up and running.
Initial setup
Wait around 30 seconds or so, then open a new browser tab and point it to https://192.168.x.y:8080 (substitute x.y with your server’s IP address, and 8080 with whichever port you mapped to it). You’ll see the Nextcloud AIO setup screen, with the password (or more precisely, passphrase) you need to access the AIO interface. Copy this to the clipboard (and paste it somewhere for safekeeping, say your password manager), then click “Open Nextcloud AIO Login” to open a new tab. Paste in the password and click “Log In.”
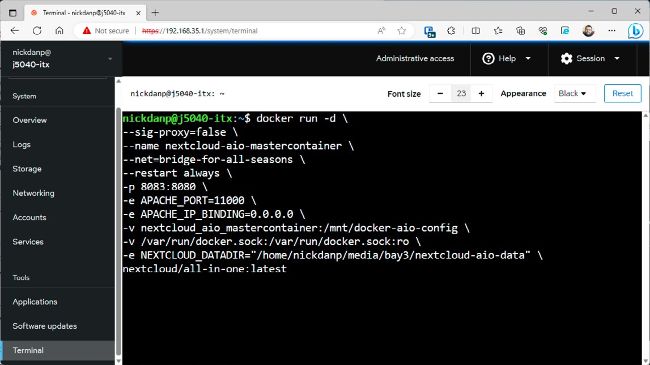
Create your Nextcloud AIO with a variant of this code.
© NEXTCLOUD
Input the domain you’ve configured in Nginx Proxy Manager to point to your Nextcloud instance, and click “Submit.” If you run into problems, check your Nginx Proxy Manager configuration is correct, and try navigating to http://192.168.x.y:11000 in your browser, followed by https://domain.com (substituting domain. com with your domain or subdomain). If both are functioning correctly, you see a hexadecimal string. If after you see this, Nextcloud still claims that port 443 isn’t open, destroy the container (docker stop nextcloud-aio-mastercontainer && docker remove nextcloud-aio-mastercontainer), and recreate it.