SERVICE & TUNE-UP YOUR PC
Ensure your PC remains in tiptop shape and fighting condition with the help of Nick Peers
© ISTOCK / GETTY IMAGES PLUS/ SHUTTEROK
ALL MECHANICAL products require maintenance to keep them running. You get your truck or car serviced at regular intervals to ensure that failing parts are spotted and replaced, while tuning the engine to improve performance and efficiency, so why not your PC too?
In this feature, we’ve developed a simple program to help you ensure that your PC’s hardware is running as well as it possibly can. We’ll start by showing you how to audit your system so you can identify everything that’s in it, from the stuff you should already know about (like your graphics card model or CPU), to more obscure components (what USB controllers is your motherboard using, for instance?).
From there, we’ll put in place tools that can help you monitor your system, providing you with early warnings for the parts that may be on their way out, from ageing hard drives to batteries in a state of decline. You’ll learn how to identify other potential problems through stress-testing, before we switch our attention to examining ways to tune your hardware for better performance, from basic updates to judicious overclocking of selected components.
Ready to put your PC through its paces? Let’s get started.
Get a detailed summary of your system with HwINFO
THE FIRST STEP to maintaining your PC is to perform a complete hardware audit. This provides you with a detailed inventory of the various components that make up your PC— including the chipsets that populate your motherboard, allowing you to monitor key aspects of them.
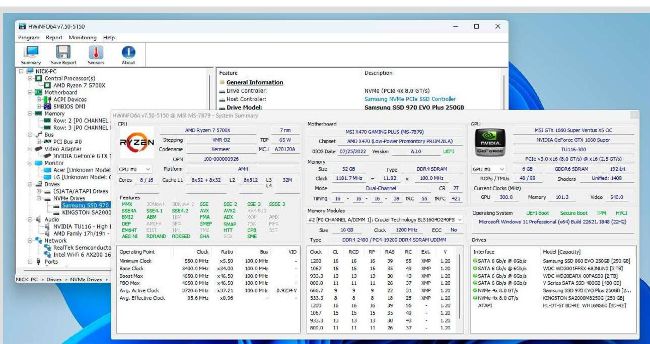
Our current tool of choice is HWiNFO (www.hwinfo.com), which is free for personal use, and can be installed or deployed as a portable app. After setting it up, launch HWiNFO and give it administrator access when prompted. You’ll be prompted to start the app, which comprises three main windows: Main, Summary, and Sensors (you can tell HWiNFO which windows to display on startup).
Once your system has been profiled, the Summary screen will display a threepaned window presenting information about your CPU, motherboard, and GPU. This provides quite detailed information about all three components—for example, the CPU pane displays your processor model, its TDP (thermal dynamic power), platform, and supported features, as well as clock information.
The Motherboard section reveals what chipset is powering your motherboard, as well as information about your system RAM: how much, its type, and clock speeds, whether it’s running in dual-channel mode, and timings. Beneath this, the Memory Modules section lets you examine the capabilities of each individual stick.
Finally, on the right-hand side, you’ll see information about your GPU, including the PCIe bus it’s on and its underlying architecture. You’ll also see at-a-glance information about your storage, boot setup (including whether it’s configured for UEFI and Secure boot, and if a TPM is present), and finally a Windows version and build number.
TAKE A DEEPER DIVE
This is all useful information, but it merely scratches the surface of what HWiNFO can tell you about your system. Switch to the main window, which works in a similar—but dare we say it, more logical— fashion to Device Manager.
You’ll see categories for your CPU, motherboard, memory, bus, video adapter, monitor, drives, audio setup, network, and ports, covering just about every aspect of your PC. While the System Summary provides a pretty detailed overview of your key components, it barely scratches the surface of what you can find out here.
For example, if you expand Motherboard > SMBIOS DMI and select BIOS, you can get details about your motherboard’s current BIOS version and TPM version. Turn your attention to the System Slots section, and you can get an overview of what PCI-E and non-storage M.2 slots you have, and what cards or chips are currently populating them.
It’s worth running through each section to see what kinds of information are available. One particularly useful section is Ports > USB. Here, you’ll see a list of all your USB controllers, both those provided by your motherboard and any third-party cards you’ve plugged in. You’ll see each controller’s manufacturer and speed at the top level, and by expanding them, followed by Root Hub, you’ll see which devices are attached to which controller. This is handy when troubleshooting problems that seem to only affect certain USB devices.