SCR ATCHBUILD A STEAM SLOCOMOTIVE IN ‘O’ GAUGE
EXPERT MODELLERS SHOW YOU HOW
Having fabricated a chassis for a Fowler LMS ‘Compound’ 4 ‐ 4‐0 last month, Jim Smith turns his attention to the boiler and cab.
HOW TO
PART TWO
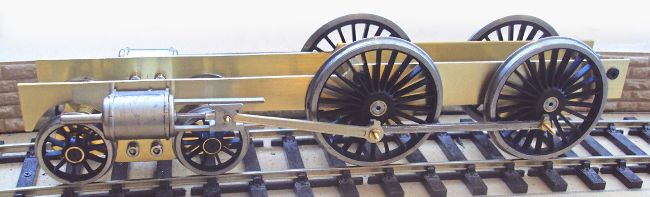
Last month, Jim explained how the chassis frames were created from sheet brass – now they await the locomotive’s superstructure.
PHOTOGRAPHY: JIM SMITH
After dealing with the foundation of the locomotive – the chassis – in last month’s issue, it’s time to make a start on the boiler, cab and running plate. On the face of it, this superstructure presents a daunting challenge to recreate from sheet metal but, reduced to individual component parts, it’s actually not as complex as you might think.
Besides, the use of copper pipe – available at your local plumber’s merchant – takes care of the boiler barrel and I also made use of metal tube for the smokebox. Cutting and shaping brass sheet for the rest of the bodywork takes time but, with a patient approach, it can all come together without too much fuss.
There’s also the opportunity to make use of existing locomotive castings or turned brass details, from a range of kit makers or locomotive detailing specialists. With the Midland and LMS ‘Compounds’ built over many years, plenty of differences existed between individual engines, especially regarding chimneys, domes, safety valves, whistles and brake piping; I haven’t provided details of the exact parts I employed. However, I will point readers in the direction of my main suppliers, Slaters Plastikard, and LG Miniatures.
Web:
www.slatersplastikard.com
www.lgminiatures.co.uk
What you will need
SHOPPING LIST
◆ 35mm diameter copper pipe, 38mm diameter aluminium tube, various thicknesses of brass sheet, brass section and strip, nickel silver wire, nuts and bolts.
◆ Availability: Model/hardware shops
TOOLS
◆ Scriber
◆ Fret saw or powered band saw
◆ Needle files
◆ Tweezers and pliers
◆ Drill and bits
◆ Tap and die set
◆ Soldering iron and equipment
◆ Calipers and dividers
◆ Clamps
BOILER & SMOKEBOX
1 Right: The boiler barrel was made from a length of 35mm copper pipe (available from your local plumbing centre or DIY store) and the smokebox wrapper was made from a short length of 38mm aluminium tube with a 1mm wall which came from an old speaker tripod. I cut the correct length accurately by sliding the nylon centre from an old insulating tape reel over the 38mm pipe to act as a saw guide. It was found that the smokebox would fit snugly onto the copper boiler with the aid of a 0.4mm thick shim wrapped round the pipe, giving a tight fit.
2 Left: A proprietary cast whitemetal Midland/LMS smokebox front was carefully filed to be a tight fit inside the aluminium tube. The inside edge of the tube was also fettled to help achieve a neat joint.
3 Below left: The other end of the copper boiler was fitted with an end plate. It’s important that this end of the pipe is cut as squarely as possible. Thankfully, the pipe I purchased had perfectly square ends, so I made sure that one of the ends was maintained and used at the firebox end. As the smokebox fitted over the opposite end, it didn’t matter so much if the cut I made wasn’t perfect.
The end plate was crafted from a 20mm wide piece of 3mm thick copper sheet. I drew a circle on it, matching the internal diameter of the copper pipe, with a pair of dividers. A hole was drilled and tapped to M2.5 at this point and the piece was cut slightly oversize with a fret saw, before filing it round until it was a tight fit inside the end of the tube.
Plenty of flux was applied before the end plate was soldered inside the copper tube, being careful to keep solder away from the outside of the pipe. This plate will allow the firebox to be bolted to the boiler in due course.