Microsoft likes to suggest that Windows gives us the freedom to do whatever we want on our PCs. Back in 2015, it launched Windows 10 with the slogan “A more human way to do”, and six years later it claimed Windows 11 “brings you closer to what you love”.
To emphasise its generosity, Microsoft made both operating systems available as free upgrades – Windows 10 until 2017, Windows 11 ongoing – allowing everyone to “create, learn, play and most importantly connect in all new ways” (www.snipca.com/53614). In truth, Windows is more restrictive than Microsoft would have us believe, with certain rules we must accept and obey.
WHAT YOU CAN DO
• Upgrade to Windows 11 on an unsupported PC
• Use Windows 10 or 11 without a Microsoft account
• Stop Microsoft forcing you to use its Edge browser
• Ditch the new Outlook for a superior email program
• Pause Windows updates until you’re ready to install them
• Block and uninstall unwanted Microsoft Store apps
• Customise the Windows Start menu and taskbar
• Disable settings that share your data and show ads
Some of these rules limit what we can and can’t do on our PCs, while others govern what Microsoft wants Windows to do – whether we like it or not. In this feature, we reveal how to beat many of the most frustrating and pointless restrictions in Windows 10 and 11, and take full control of your computer.
Breaking some of these rules involves tweaking system settings, so you may want to create a system restore point before following our advice. Type system restore in the search box and click Open under ‘Create a restore point’. Select your main hard drive then click Create. To roll back your PC, click System Restore.
BEAT WINDOWS 11’S UPGRADE RESTRICTIONS
The Windows rule that’s currently bothering the most users is Microsoft’s insistence that your PC meet specific system requirements to upgrade to Windows 11. Unless it has TPM 2.0 and Secure Boot enabled, a compatible processor, at least 4GB of RAM and 64GB of storage, you won’t be able to install the new operating system. Run Microsoft’s PC Health Check app (www.snipca. com/53573) to see which requirements your PC meets (see screenshot below)
With support for Windows 10 ending on 14 October, these restrictions are no longer merely frustrating but also a safety concern. If you can’t afford to buy a new Windows 11 PC, like Microsoft wants you to if you can’t upgrade, you’ll be left using a computer that won’t receive security updates or bug fixes.
At the end of last year, online reports suggested that Microsoft had relaxed the upgrade requirements for Windows 11, but this was swiftly denied (see www. snipca.com/53562). If you try to install the operating system on a PC that doesn’t meet the minimum requirements, the installer will refuse to continue, just as it did before.
Thankfully, there are ways to beat this strict rule and upgrade to Windows 11 on an unsupported PC. Bear in mind, however, that Windows 11 may not work as smoothly as it will on a machine that’s built to support it.
We’ve previously recommended the free program Rufus (www.snipca.com/53499) for this purpose – see page 51 of our ‘Windows 10 is doomed’ Cover Feature in Issue 693 (buy a back issue from www. snipca.com/52735). But Rufus requires you to boot Windows 11 from a USB stick, and is best suited to performing a clean install of the operating system. Our preferred method for breaking the minimum-requirements rule is now Flyby11 (www.snipca.com/53563), which lets you perform an in-place upgrade directly from your Windows 10 PC.
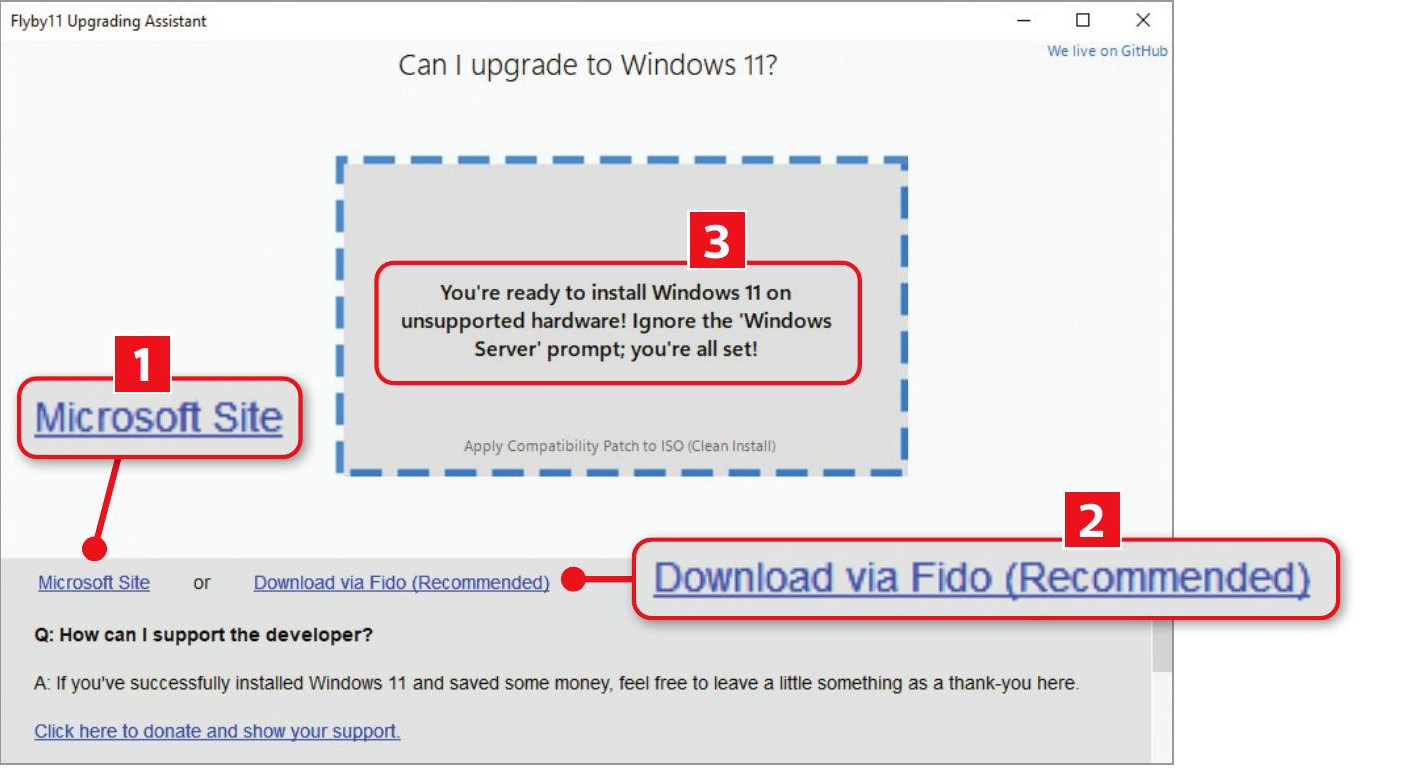
Flyby11 beats Microsoft’s restrictions to install Windows 11 on unsupported PCs