MASTER RAW!
MASTER RAW!
Transform your captures with just 10 essential edits in Adobe Photoshop CC’s Camera Raw. Dan Mold shows you how

Shooting in RAW will give you more to work with afterwards, helping to transform your images from the ordinary to the extraordinary.
Getty
U nless you’re a professional news or sports photographer who needs to send JPG files to a picture desk in real time, there’s no reason for not capturing raw files at the point of shooting. Thanks to their compressed file size, JPEGs are brilliant for sharing and storing, but if you want to take your photography to the next level, you’ll need to be able to exploit the full information contained in a raw file.
Unlike JPEG, which actually stands for ‘Joint Photographic Experts Group’, ‘raw’ isn’t an acronym; it literally means the raw data straight from the camera. This extra data does come at the cost of larger files, and at up to four times the size it’s true that raw files will fill a memory card or hard drive faster. But this is a price worth paying for the additional editing possibilities they allow. Many of us already use raw files in our workflows, but for those who don’t there’s a great way of getting started: set your camera to capture both JPEG+RAW formats, choosing the highest-quality raw format available, until you become comfortable with shooting solely in raw.
But it’s what you do with your raw files that matters most. So we’ve designed a workflow for Adobe Photoshop (other raw image editing software is available) that’s based around the 10 essential editing steps you’ll need to get the most from your valuable post-production time…
1 HOWTO CROP AND FIX LENS DEFECTS
Some simple tweaks to get you familiarised and started in ACR
O pen a Raw file in Photoshop CC and it will automatically launch Adobe Camera Raw in its own plug-in window (see below). The first thing to do is correct any lens distortions such as barrel distortion from wide-angle lenses or pincushion distortion from using a telephoto optic. You’ll also want to fix any vignetting in the corners and chromatic aberration where bright purple or green colours appear in areas of strong contrast. It’s near impossible for a lens to not have any chromatic aberration, though premium lenses do a better job at mitigating this. The last of the initial tweaks is to apply a crop, as there’s little point working on areas that will be cropped out of the final image.
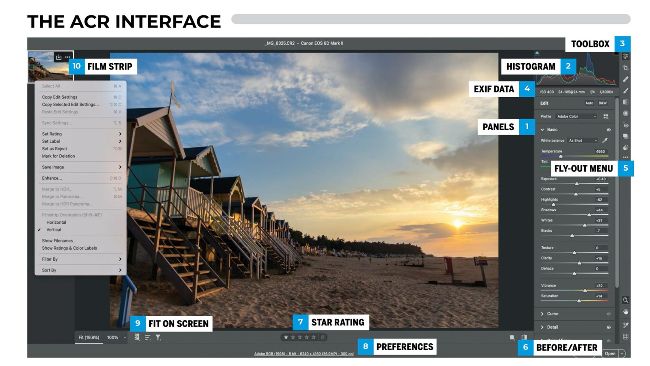
T his is what you’ll see when you open a raw file in Photoshop CC, as it automatically launches the integrated Adobe Camera Raw (ACR) plug-in. Here you’ll find the features and tools to help squeeze out as much from the raw data as possible. Starting above, and continuing over the next 10 pages, we’re going to walk you through the 10 essential editing techniques in ACR – to make the most of your shots in postprocessing, we believe that these are the only editing steps you’re ever going to need. So read on to learn everything from basic raw conversions to more advanced editing – and while written for ACR, much of this is also relevant for Lightroom Classic CC, which uses a similar interface and tools.
Before
Dan Mold After
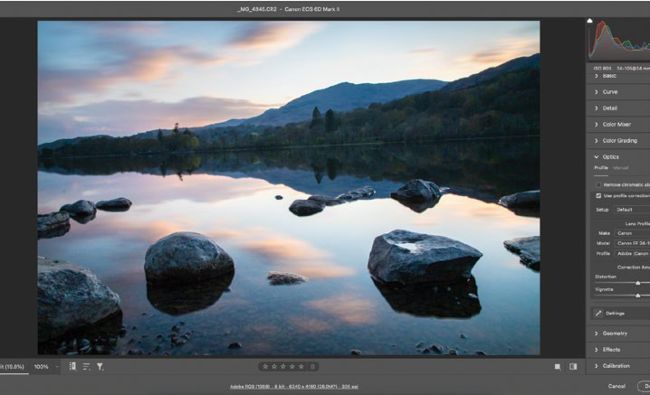
1 Enable lens corrections
Head to the Optics panel and tick Use profile corrections. If your lens isn’t automatically recognised then you can choose your lens from the list. You can also take full control by clicking the Manual tab and dragging the Distortion and Vignette sliders to fix these issues.
2
Fix any fringing
Zoom in and look for colour banding on lines of contrast. If you spot fringing, tick Remove chromatic aberration in the Optics panel. For more control you can expand the Defringe panel and either drag the Purple Amount & Hue or Green Amount & Green Hue sliders.