Photo active
10 things you can shoot, edit or create this month, from stately homes to camels and cycle races
1 | CREATIVE
Creating anaglyph images
Wendy Evans enters a third dimension and travels back in time to the glory days of 3D
The history of 3D, especially in the cinema, is somewhat tortuous, with almost every new iteration following the same cycle of a boom in popularity, an initial wave of enthusiasm in the industry, general dissatisfaction and eventually, the sound of thousands of 3D glasses being emptied into landfill.
3D attempts to replicate how our eyes see the world, which is basically two image streams, with viewpoints around six inches apart, slightly angled to focus on the subject so each one has a slightly different perspective. Our brains then process the two inputs and create one image with three-dimensional depth.
These days, what’s left of the 3D industry shoots scenes with a brace of converging cameras and displays them for viewing with polarised glasses in the cinema. These work by having the left lens block out the images from the right camera and the right eye lens block out those from the left camera. Your brain does the rest. For a while, the home 3D movie boom was fuelled by active shutter glasses, which essentially do the same thing but require a power source to synchronise how the two image streams are displayed.
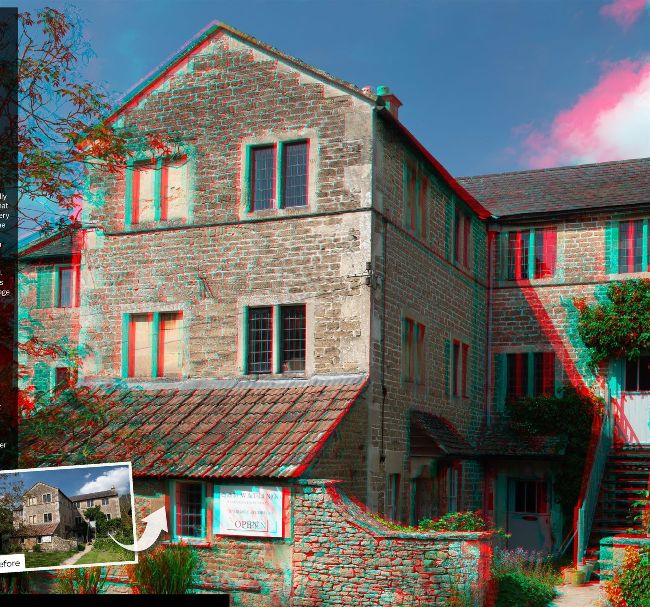
This is the final 3D image from our project. It has been converted to CMYK for printing in the magazine, so it’s not quite as effective as the RGB version, but it still works.
However, back in the 1950s, the first 3D boom was based on the anaglyph 3D technique, which works in a similar way. That’s what we’ll show you here, as well as how to create 3D effects from just a single image, using Photoshop. Before
1/80 sec f/8 ISO 100
How to create a 3D illusion
Want to create a 3D effect on a photo you’ve already taken? There’s a quick and easy way to create a 3D effect on an existing image but it works best on images where there are no foreground objects protruding into the top half of the photo. Simply load your photo, go to Channels and click on the Red channel. Press Cmd-A/Ctrl-A to select the channel, then go to Edit > Transform > Skew and drag the top left control point to the left. Do the same with the control point in the top right corner. In the Channels palette, click RGB and use the Crop tool to remove the triangle of red that has appeared. Now you can view your new anaglyph 3D image.
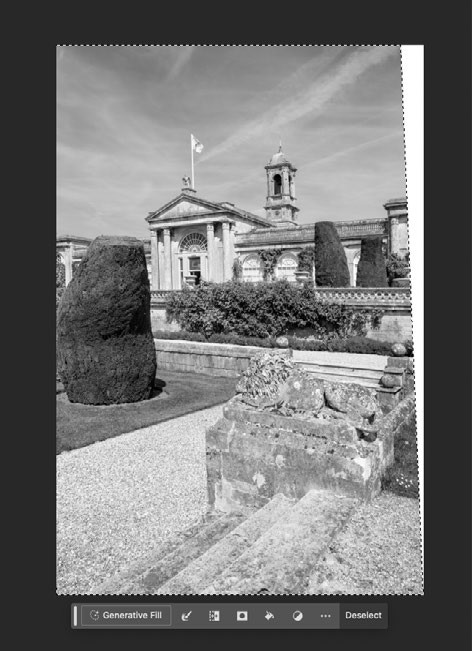
Manipulate the Red channel to make the image look like it’s receding. If you have green-magenta glasses do the same thing with the Green channel.
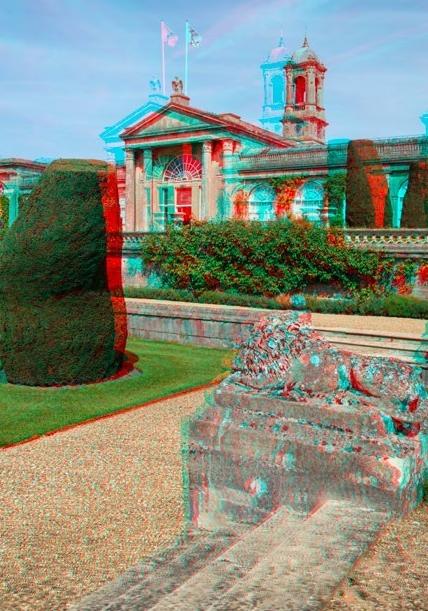
You can create a simple 3D effect from a single image. The limitation is that there can’t be a large foreground item as it will appear to be falling over.
There are two types of anaglyph 3D glasses: red-cyan (blue plus green) and green-magenta (red plus blue). The reason why two colour channels have to be combined is obvious –you only have two eyes and 3D glasses only have two lenses. The red-cyan glasses were initially popular in the 1950s and for home video releases before green-magenta ones became popular for home DVD releases. At the moment, it’s easier and cheaper to find red-cyan glasses, so we’ll use those two colour channels here. If you already have green-magenta glasses, replace mentions of red with green and cyan with magenta.
Shoot the scene
The first thing to do is find a scene you want to turn into 3D. Take your tripod along, as this will minimise vertical movement, which would make it harder to view the scene. Look for a focus point that you want to be the converging point for the images – the point that appears at the surface of the monitor or print image. Anything in front of this will appear nearer and everything behind will be further away. There is a limit to how near or far the 3D elements can be made to appear before it causes eye strain or your brain to be unable to decipher the image. So it’s worth taking a few different sets of images, aiming for more of the scene behind the focal point than in front of it.
Once you’ve identified your focal point, focus on that and use a narrow aperture to create some depth of field. Having a person as the focal point (make sure they stand still) can make an interesting option. In this case, experiment with an aperture of f/2.8 and take your shot. Note the settings used and for a consistent exposure, switch to manual mode for the second shot. Now take a step to the right with the camera and aim at the focal point to give you a different perspective.
Try varying distances between the two shot positions, to see how that affects the scene in 3D, where a lot depends on how far away the focal point is, and the relative distance from there to the nearest and the furthest element. However, don’t move more than a metre as it will be too difficult for your brain to combine the images. Having taken the images, it’s time to jump back in the DeLorean, or other motorised transport, and head back to the Photoshop lab.