Photo Active
10 things you can shoot, edit and create this month, from butterflies and castles to the perfect confetti shot
1 | LANDSCAPES
How to create depth
Mark Bauer and Ross Hoddinott explore another element of classic scenic shots
One of the biggest problems that landscape photographers face can be summed up quite simply: the world is three-dimensional but the medium in which we are trying to represent it has only two dimensions. One of the main reasons why landscape photographs fail is that they don’t convey the sense of depth that we perceive when we view the scene in reality. Often, when we see a photograph that doesn’t quite work and we say it looks a little flat, we mean it quite literally.
Fortunately, there are a few compositional and technical tricks we can employ to circumvent this problem and create the illusion of depth in a two-dimensional medium.
Foreground interest
One effective way to create depth in a photograph is to include a strong foreground element, often in conjunction with the use of a wide-angle lens. Emphasising the foreground in this way adds depth to a picture by creating an entry point for the eye, pulling the viewer into the scene and providing a sense of distance and scale. This technique works particularly well with wide-angle lenses because of the way they stretch perspective, exaggerating the size of elements close to the lens and opening up the view beyond.
Pro tip: Go wide
Using a wide-angle lens exaggerates perspective, enhancing the feeling of depth in a photo. It has the additional benefit of increasing the depth of field, helping to create front-to back sharpness, which can also add to a feeling of depth.
PART 4 OF 6
Part 5 in issue 281, on sale 26 April
When using this technique, you will need to pay attention to what’s going on in the middle distance, and also to the height of the camera. Because of the way in which a wide-angle lens can open up the planes in the middle distance, if you shoot from too great a height, there can be too much empty space in this area. The solution is to shoot from a lower viewpoint, which compresses the middle distance. Get too low, however, and you may find that there’s not enough separation between objects in the middle distance, or between the middle distance and the background.
Camera settings: Canon EOS-1Ds Mark II, 17–40mm (at 20mm), 1/5 sec at f/16, ISO 100, polariser, 2-stop ND grad
It may sound like a straightforward technique, but to apply it well takes skill and attention to detail. Too often, photographers fall into the trap of sticking anything and everything in the foreground, regardless of whether it suits the picture or not, and ignoring the rest of the scene. It’s worth spending some time finding foreground elements that complement the background and exploring different ways of relating foreground, middle distance, and background to make a cohesive whole.
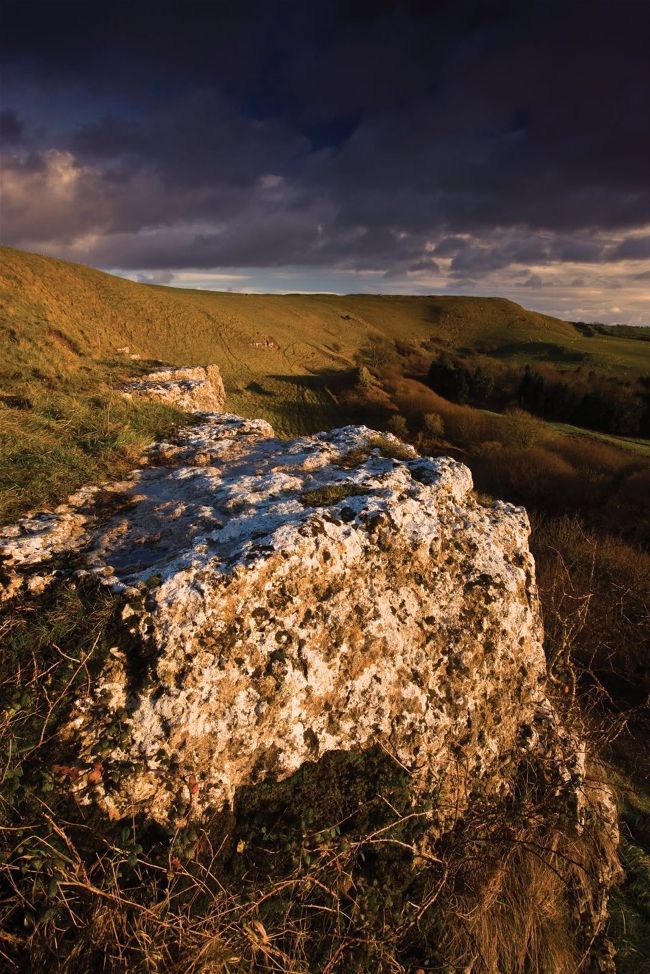
The right foreground
It’s easy to allow a foreground element to become too dominant and small changes in your position can have a big impact. In the first picture (above), although the light is dramatic and reveals the texture of the foreground rock, the rock itself is badly placed in the frame, blocking the view of the middle distance. The second picture (opposite) demonstrates a much more considered use of the same foreground rock – it frames the picture at the bottom, lines up with the peak of the hill in the background, and the lines pointing inwards at the bottom of the frame help to draw the eye into the picture.
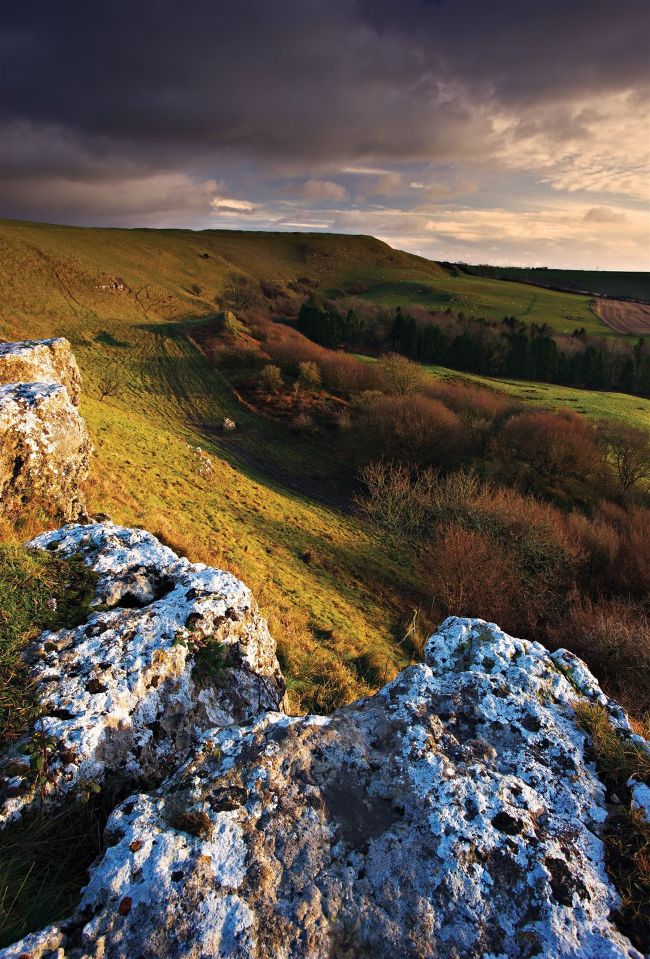
Camera settings: Canon EOS-1Ds Mark II, 17–40mm (at 20mm), 1/2 sec at f/16, ISO 100, polariser, 2-stop ND grad
BIG FOREGROUNDS
The ‘big foreground’ is a wellestablished look in landscape photography. It is, however, in danger of becoming a visual cliché and it’s worth remembering that foreground interest doesn’t have to be big to be effective. More subtle elements can work just as well, such as reflections in wet sand, the pattern of waves breaking on the shore, or the shadows cast by trees.
Layering light
For this shot of a hill fort, I set up my composition in anticipation of the sun breaking through a gap in the heavy cloud. When it arrived, the ridges and hilltops were lit, highlighting their form by leaving the valley in shadow and creating a layered light effect. Camera settings: Fujifilm GFX 50S, 55–110mm, 1/20 sec at f/11, ISO 100, polariser
Aerial perspective
Hazy or misty conditions are excellent for exploiting aerial perspective (see below) and creating a feeling of depth, especially if there is a degree of backlighting. Camera settings: Nikon Z 7II, 100–400mm (at 320mm), 1/25 sec at f/11, ISO 64
Using colour to enhance depth
In visual terms, warm colours advance and cool colours recede. We can use this to enhance the feeling of depth in a composition by placing warm colours, such as reds and oranges, in the foreground, and cool colours, such as blues and greens, in the background. The warm colours of the poppies in the foreground advance compared with the cooler greens in the background, helping to enhance the feeling of depth in this shot. Camera settings: Fuji X-Pro2, 10-24mm (at 10mm), 1/3 sec at f/16, ISO 200, polariser, 2-stop med ND grad