BUILD THE ULTIMATE RESCUE DISC
Nick Peers on how to prepare for the worst

© EYECRAVE PRODUCTIONS/GETTY IMAGES
Everybody needs some form of rescue disc—the problem is there are so many to choose from. Keeping a drawer full of USB flash drives can be a pain, but did you know that you can keep all the recover y tools you need on a single USB flash drive? Splash out on a 64GB or 128GB drive, pair it with the right software, and it can house all your recover y discs, complete with boot menu, allowing you to switch as required.
Fantastic news, but what recover y media do you need, where do you find it, and how do you add it to your all-encompassing recover y media? In this feature, we’ll show you how to set up your recover y media to make the process of adding recover y tools a case of little more than copying ISO files to your flash drive. When new versions of your recover y media emerge, simply download the latest ISO file, and copy it over the original copy to update it.
We’ll show you where to look for the best targeted recover y tools, from malware removal to Windows recovery, plus reveal how to build your own customized Windows ‘live’ environment, so you can use your favorite fix-it tools in an environment that you’re familiar with. Without further ado, let’s build the only rescue disc you’ll ever need.
Let’s start at the beginning. You’ll need two items to get your ultimate recover y media up and running. One is a USB flash drive, the larger the better (although 64GB should suffice in most cases). The other is the tool required to transform your flash drive into a Swiss army knife by allowing you to store multiple rescue discs on a single drive. That tool is Ventoy (www.ventoy.net), and it’s incredibly simple to set up and use. For the purposes of this feature, follow the instructions in the box to make your USB flash drive ready for use.
ADD SECURE BOOT SUPPORT
Once you’ve installed Ventoy, you need to make sure that you can use it on your PC. The biggest hurdle is if Secure Boot is enabled on your PC, as it will be in many cases. On booting from the drive, you’ll likely be presented with a ‘Verification failed (0x1A) Security Violation’ message. Press Enter, followed by any key, to perform MOK management. Select ‘Enroll key from disk’, choose your drive (V TOYEFI in most cases), and then pick ‘ENROLL_THIS_KEY_IN_MOKMANAGER.cer’. Choose Continue > Yes > Reboot.
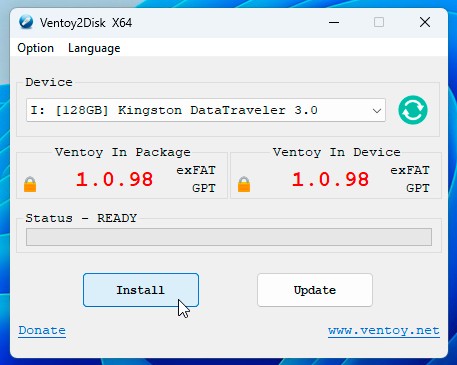
Ventoy transforms your USB flash drive into recovery media.
You should now find yourself at the main Ventoy screen—there won’t be any options to boot from, so press F4 for ‘local boot’ to return to Windows proper. Going forward, this enrolment means that you can use the Ventoy boot disk on your own PC—you must repeat the process for every other PC you use the disk on. If you’re unable to get it to work with Secure Boot, recreate the disk with ‘Secure Boot Support’ disabled, then remember to disable Secure Boot on your PC whenever you need to use the disk.