BLENDER
Model and render objects in Blender
We love tea at Linux Format Towers – even that fancy herbal stuff – so Michael Reed is going to show you how to make a lovely cuppa… in Blender.
Credit: www.blender.org
Part Two!
If you missed part one of this series, turn to page 64
OUR EXPERT
Michael Reed has been playing around with Linux since first trying out Slackware back in 1996.
QUICK TIP
If you’re unsure about a change that you’re going to make (such as when working on the handle in this tutorial), press Ctrl+D to duplicate the object. Move it out of the way, then click the eye icon in the Outliner to make it invisible until you need it again.
We’re going to make a tea mug using Blender, taking inspiration from a real-world object. First, we’ll take some basic measurements from the object. Then, we’ll model the two main components of the mug: the body and the handle. Then we’re going to add appropriate materials to surfaces of the model. Bear in mind that Blender is a 3D modeller and not a CAD program, so we’re going for something that aesthetically resembles the original object rather than following it to the millimetre.
The model mug
The mug we’ve chosen is quite large and wide, easily capable of powering a caffeine-fuelled, mammoth Linux session. Taking the ruler to it, it’s around 100mm tall and the opening is 94mm wide. The wall of the mug is about 4mm thick. The diameter of the body is inconsistent, but it tapers off at around 15mm from the bottom. That gives us the basic measurements we need to get modelling. It also features surfaces of two different colours – an inner and an outer – but that’s fairly easy to handle in Blender.
Because the object we’re going to be working on is relatively small, let’s start by setting the units that we want to work with to millimetres rather than the default of meters. Within the Properties Browser (lower lefthand side of the screen), select the Scene Properties tab. Within that panel, under the Units heading, select Millimeters in the Length field.
Delete the default cube (click it and press Delete). With most modelling, you start with a primitive mesh that most resembles the final object that you want to model, and in our case, this is the cylinder mesh. Add a cylinder mesh to the scene (Add>Mesh>Cylinder), and don’t click anything else for the moment.

This is the starting cylinder mesh, with the top face removed, shown in Edit Mode.
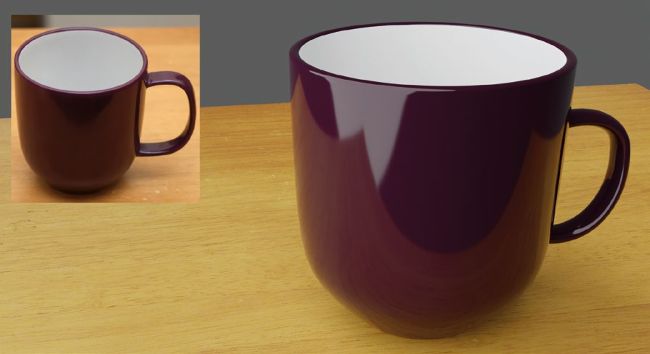
The mug we used for the basic measurements and our rendered model. Let’s call the differences ‘improvements’.
Typically, the cylinder will be created at the wrong scale for an object of this type. Look carefully, and you’ll see that a small, collapsed menu has appeared in the bottom left-hand side of the viewport area with the words Add Cylinder on it. Click the little triangle to expand this menu, and we’ll use it to alter the default specifications of the cylinder.