Recover deleted files
YOU’LL NEED THIS
EXTERNAL HARD DRIVE
To store disk image/ Windows backup
USB STICK
For bootable OS (System drives only)
WITH THE RISE OF ONLINE APP suites and cloud storage, horrific data loss scenarios are becoming rarer. Still, as anyone who’s worked in IT knows, people don’t always engage in best practices when it comes to data storage. The subreddit ‘Tales from Tech Support’ even contains a number of stories of customers storing important documents in their Recycle Bin!
In this scenario, if files are accidentally deleted from Trash, there’s no automatic way to retrieve them. Even expert PC users can fall victim to this if a failed update or malware corrupts a drive, or if they accidentally delete the wrong partition. There are many data recover y programs, but TestDisk and PhotoRec stand out. Firstly, they’re both free and open-source. Secondly, in our tests simulating accidentally deleted files, a formatted drive, and a corrupted partition, both utilities retrieved files with flying colors.
In this guide, you’ll learn how to create a backup image of your drives before attempting recovery. You’ll also learn how to use PhotoRec to safely recover files, as well as configure TestDisk to restore lost or damaged partitions. Both utilities come with a warning that they’re provided without any guarantee whatsoever, advice that we echo for this tutorial. If you feel uncertain, then there are forensic specialists who can attempt recover y for you.
–NATE DRAKE
A
1 BACKUP WINDOWS DRIVES
The PhotoRec utility doesn’t write to affected disks, so at the very least, using it shouldn’t make it harder to retrieve deleted files. Still, each time you mount a drive, there’s also the possibility that data can be corrupted, particularly if it’s damaged. TestDisk also writes to partitions.
» This is why it’s important to create an image of the drive you want to recover, so the original won’t be affected by your attempts to recover deleted data. Most importantly, if you’re unsuccessful, you can provide a copy of the image to a data forensics specialist to work on with more advanced tools.
» To get started, you’ll need to connect an external hard disk to your machine with enough capacity to store an image of your hard drive, as well as any other connected disks. Make sure you save and close any open files, as well as exit any running programs first.
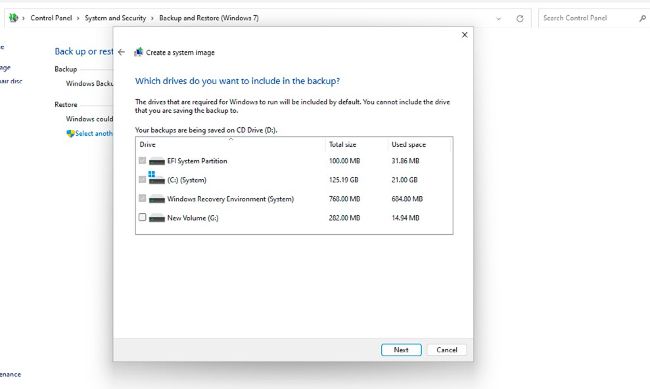
» Next, open the Windows 11 Control Panel via the Windows search bar. Find the ‘System and Security’ section, then choose ‘Backup and restore’. Next, click ‘Create a system image’ in the left-hand pane.