BUILD YOUR OWN NAS
Nick Peers extols the virtues of building your own network storage device
VERYONE NEEDS a server—a centralized machine doing what it says on the tin, namely serving the various needs of your network. Whether you’re a media lover (Plex), distrust online services (Nextcloud, self-hosted Bitwarden) or simply want a central shared folder with 24/7 access for everyone, a server has you covered.
The obvious thing to do is purchase a dedicated machine for the task—a NAS such as those offered by QNAP or Synology are effectively mini-PCs designed to meet all your needs. So why build your own? Aside from the fact it’s what we do on Maximum PC, building your own server allows you complete control over its spec. You’re also free from manufacturer constraints: instead of a proprietary operating system with a finite shelf life, you get to work with a popular open-source OS that offers ten years’ rolling support for each LTS version released. Your self-built server will outlast any proprietary NAS.
So join us as we reveal all you need to spec the perfect server. We’ll run through putting it all together, plus get you set up, from installing Ubuntu Server and a web front end for headless access to tweaking the UEFI to eke even more power savings. Enough idle chat, let’s get cracking…
LET’S START by speccing out your NAS server. We’re looking for a machine capable of running 24/7 without making too much impact on your energy bills. That means a suitably low-wattage system with the added benefit of being as quiet as possible. The solution can be found with Intel’s Pentium and Celeron J-series processors, which you’ll find in midrange QNAP and Synology NASes as well as barebone mini NUC PCs.
You won’t be compromising on performance—these are quad-core processors with support for hardwareaccelerated UHD graphics, so are perfect for on-the-fly transcoding of Plex media streams, for example. Yet the chips—embedded directly into the motherboards—draw so little power (10W maximum) that they’re cooled solely with a heatsink.
There’s one fly in the ointment— such boards can be difficult to source. I got lucky back in late 2020 with my J5040-ITX board from ASRock, but these days you’re more likely to land one of its slightly less-powerful siblings, the ASRock J5005-ITX or Celeron-based ASRock J4125-ITX. No matter, all three quad-core processors make for a superb base for your system, if you can find them.
You may have to look to import from elsewhere for a premium (try www.mini-itx.com, a UK-based company that ships to the US) or scour the likes of eBay for US-based sellers. We saw several J4125-ITX boards available from $110, and one J5005-ITX being auctioned from Illinois at the time of writing. If you’re still unable to source a board or the cost is beyond you, then check out the box for an alternative approach that pairs a barebones Intel NUC with a NAS-like enclosure. Not quite as elegant, maybe, but equally as effective.
FLESH OUT YOUR SPEC
If you’re lucky enough to source one of these boards or something similar, then the next thing is to locate a suitable case to house them in. Our current recommendation is the JONSBO N1 Mini-ITX NAS Chassis ($150, www.newegg.com/p/2AM-006A-00074). The case comes with five 3.5-inch removable drive caddies connected to a server-grade SAS backplane, and there’s also an internal 2.5-inch bay for a fast SSD boot drive.
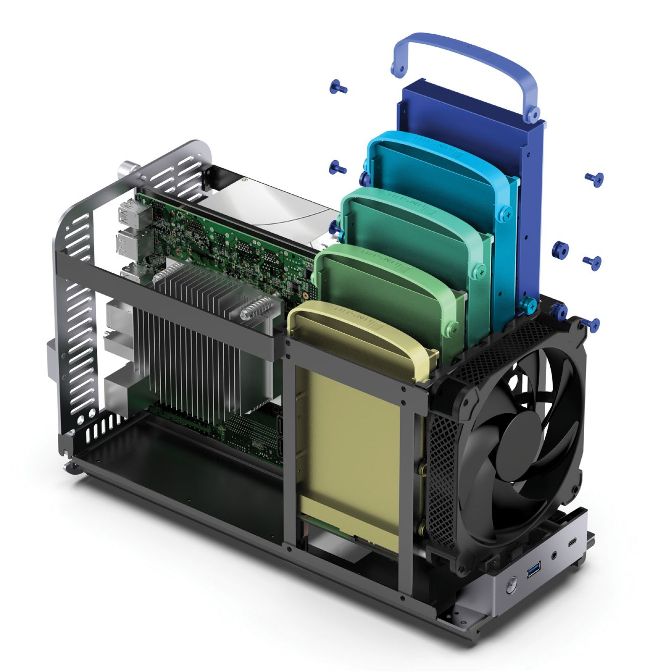
Choose a chassis with lots of drive bays.
A front-mounted 14cm fan helps cool the drives, and there’s space for one half-height PCI-E expansion card. The chassis can be placed on its belly or stood upright—in the latter configuration, its footprint is 210mm x 170mm, with a height of 354mm.
You’ll need to supply your own SFX form-factor PSU—raw power isn’t important as five 3.5-inch drives and one 2.5-inch SSD drive draw less than 50 watts combined at full use (so significantly less in reality). If money is no object, the Seasonic FOCUS SGX- 650 ($149, https://www.amazon.com/ dp/B09NZG8GR8) ticks all the boxes and comes with a decent ten-year warranty. Too expensive? Try the EVGA SuperNOVA 450 GM ($85, https:// www.amazon.com/dp/B07JFLNG3B). The 450-watt model will be more than ample for your needs, although the 650W model is currently just $5 more.
You’ll also need to invest in some SATA cables with right-angled connectors at one end to connect the SAS backplate to the mobo due to the lack of space between it and the case. Shop around for multi-pack deals—a three-pack 12-inch SATA cable connection costs around $6 on Newegg (www.newegg.com/p/N82E16812119910), for example.
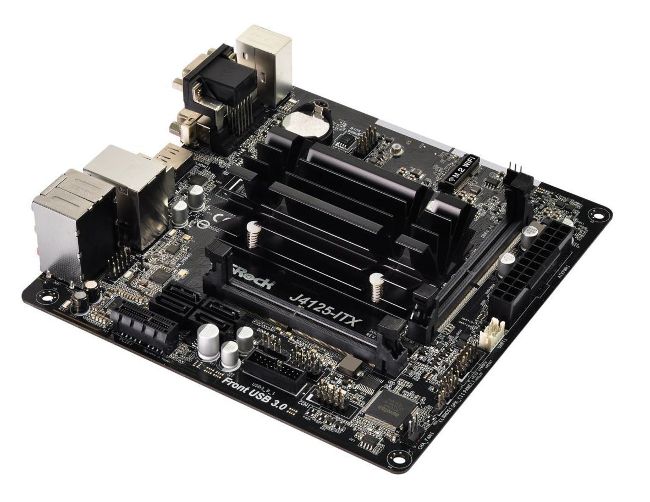
J-series mobos embed the chip (with heatsink) on the board.
support up ©
ASROCK.COM,
WWW.JONSBO.COM, HTTPS://WWW.TERRA-MASTER.COM
TAKE THE MINI-NUC ROUTE
If you’re struggling to source a suitable mini-ITX board to base your NAS around or looking for a simpler, cheaper option then consider pairing a mini-NUC PC with a dedicated NAS-style enclosure connected to the NUC via USB. The advantage of this approach is that Pentium Silver-based NUCs are widely available, such as Intel’s Pentium Silver J5005 barebone NUC ($220, www.newegg.com/p/N82E16856102319).
Just add RAM (up to 8GB) and an SSD boot drive and you’re good to go—it even has Wi-Fi onboard alongside four USB ports, two HDMI ports, and an Ethernet port. Equipping this with 8GB RAM from Crucial and a WD Red SA500 500GB SSD drive would set you back around $100 in total, bringing the total cost to around $325 for your main server.
You’re then left with sourcing a suitable NAS-style enclosure, such as TerraMaster’s D5-300C ($176, www.amazon.com/ dp/B06ZY6DK8N), a five-bay enclosure with RAID 0, 1, and 5 support on the first two drives if needed. Its power consumption equates to what you’d expect from five drives—just under 50 watts under a full load.
Fit two 4TB WD Red Plus drives to get started for a combined $140 and you’re looking at a total outlay of around $650 for your NAS setup with 8TB storage, with room for additional storage as and when you need it.