ZBRUSH | KEYSHOT | PHOTOSHOP
MODEL A FEROCIOUS DEATHCLAW
Practical tips and tutorials from pro artists to improve your CG skills
Marcus Whinney explains how to sculpt and render a Fallout-inspired creature
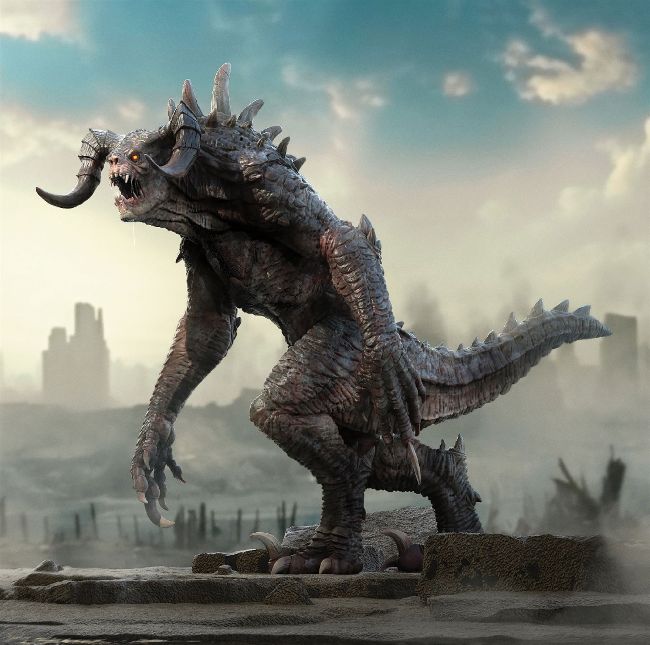
DEATHCLAW Fallout’s vicious deathclaws are the result of genetic engineering
AUTHOR
Marcus Whinney
Marcus is a senior character and creature artist with more than 10 years of pro experience in film and game design. He has a passion for creature concepting. artstation.com/mlw_creative
Crafting creatures is my number one passion as a 3D artist. In this tutorial, I’ll talk you through the steps on how to create a high-quality deathclaw model from the post-apocalyptic Fallout universe. This process will involve working with ZBrush, KeyShot and Photoshop.
The primary goal for this walkthrough is to give my overall thoughts on how to create a high-poly model that’s ready to drop into your portfolio, and to teach new techniques you can take into future creature and character concepts. Using the industry-standard ZBrush, we’ll start off by blocking in our creature using primitive shapes and explain how to build a precise silhouette using image planes as references.
Then it’s on to DynaMeshing the primitive models together in groups and adjusting the forms to closer fit the concept and references. We next turn to individual parts of our model using standard ZBrush brushes to sculpt and form the shapes, paying particular attention to the secondary forms.
Once the individual body parts are at a good place overall, we’ll then merge everything together and clean up the seams to form a single SubTool. From that we’ll work the finer details on a ZRemesh model at a higher subdivision level, utilising alpha maps on brushes, as well as other standard brushes for the more detailed areas. I’ll also talk about creating the creature’s extra features such as teeth, claws, eyes and spikes using primitive shapes as base models, and then define them further in the same way as the body.