TUTORIALS Control model trains
Take Pi control of your model trains
JMRI
“Choo, choo!” shouts Sean Conway as he shows you what he’s been up to after a long absence in the Canadian wilds. Yes, he’s gone loco…
OUR EXPERT
Sean Conway is a former IT security specialist from a national telecommunication company who implements Pi-based projects to get his much-needed technology fix after retiring.
YOU NEED
Raspberry Pi 4B 4GB 16GB SD card Pi Imager v1.8.5 2024-03-15-raspios JMRI suite v5.8 Java Zulu 11.74.15
As luck would have it, when the author of this tutorial was asked if he was working on any projects that would appeal to both regular readers and hobbyists, he was looking at how to control a model train using a smartphone.
The goal of this article is to provide sufficient details for a you to create a network access point (AP) using a Raspberry Pi single-board computer, then install the open source Java Model Railroad Interface (JMRI) software that enables an app on the phone to access the locomotive encoder via the AP.
The first task is to get an operating system installed on the SD for installation in the Raspberry Pi. Many of the online builds for such a project use the 32-bit Raspbian OS. This build will use the 64-bit OS. After imaging the Raspberry Pi 64-bit OS image on the SD card, put the card in the Raspberry Pi and apply power to establish the OS.
Maintaining the standard LXF has of supporting its readers with tutorials that assist them in actually getting stuff working, let’s flesh out that OS installation statement a bit more. Install the operating system image on an SD card using Raspberry Pi’s own imaging software utility, Imager.
The three menu buttons from the Applications page of the software allow you to Choose Device (the Pi hardware), Choose OS (the operating system) and Choose Storage (the memory card for installing the operating system on).
After stepping through the three options, we arrive at the Use OS Customization? screen. Select the Edit Settings button and make the changes as shown below. When complete, save and select Yes to ‘Would you like to apply OS customization settings?’ Grab a cup of tea while the image is created. When complete, insert the SD card into the Raspberry Pi. Using an Ethernet cable, connect the Pi to a network that has internet access. Apply power and the Pi should boot.
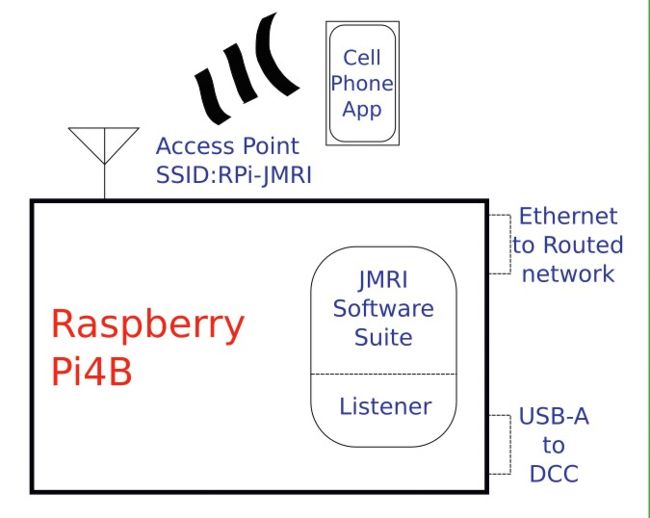
Smartphone talks to Pi AP. Pi runs JMRI, which talks to controller.
Recall that we enabled SSH through the Service tab in Imager (see table). Now let’s use a command-line terminal window on a remote host to connect to the Pi and complete the setup.
One connection option for the SSH protocol is to use the Pi’s IP address: ssh pi@ . As we don’t know the IP the Pi is using, let’s take advantage of some software that helps us.