Fix problems with Windows Repair
YOU’LL NEED THIS
A
TWEAKING.COM’S WINDOWS REPAIR
(www.tweaking.com) This comes in Free and Pro versions: we’re focusing on the free version in this tutorial
IT DOESN’T MATTER how carefully you look after your Windows installation; things can—and do—go wrong. Whether it’s a flaky installer introducing gremlins into your system or you’re trying to recover from a malware infection, many fixes often involve complicated trips into the Registry, where the wrong tweak could risk even greater damage being done.
Thankfully, there are tools that specialize in such fixes. The best by far is Tweaking.com’s Windows Repair tool. It may no longer be updated as frequently as it once was, but it remains an invaluable part of any user’s toolkit, whether you’re running Windows 10 or 11. In this tutorial, we’ll run through its free troubleshooting and fix-it tools, ranging from restoring file permissions and repairing key system components to reversing the damage done by malware.
We’ll also reveal how to perform some of its Pro-only fixes for free using other tools, and point you toward repair and fix-it tools for adding to your troubleshooting armory, including one that specializes in fixing issues preventing Windows from loading successfully.
–NICK PEERS
1 OBTAIN AND LAUNCH WINDOWS REPAIR
Head over to www.tweaking.com and click the ‘Download Free Version’ to download the setup file for Windows Repair. Once downloaded, simply double-click the file and follow the installation instructions. When the installer finishes, we recommend unchecking both boxes before clicking Next, followed by Finish. The reasoning is simple: Windows Repair is best run in Safe mode.
» If you’d prefer to download a portable version—for use on other machines via a USB flash drive, for example—then you’ll need to source it from a third-party downloads site, such as Downloadcrew (www.downloadcrew.com/article/31975/winrepair_portable). Download the zip file to your hard drive, then extract the contents to a suitable folder on your external drive.
» Once the program is installed, you could put it to one side until it’s needed, but we recommend running it immediately to allow it to perform some key maintenance tasks that can spot— and repair—non-critical problems that might escalate if left untreated. Note, however, that this requires rebooting your PC in Safe mode—with networking enabled so you have Internet access if it’s required.
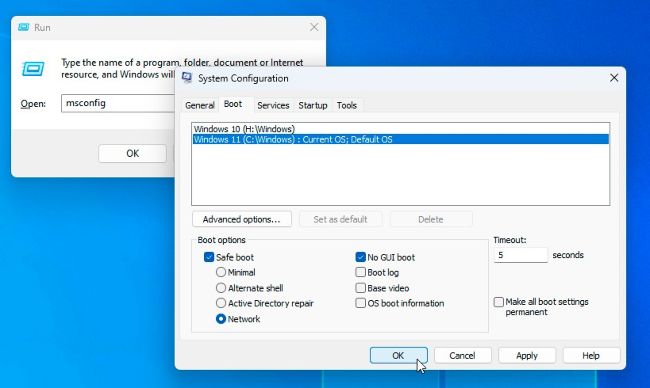
» You can do this via Settings, but it’s a long, convoluted process that requires rebooting to the Advanced Startup Menu. A far simpler option is to press Win + R, type msconfig, and hit Enter to open the classic System Configuration tool. Switch to the Boot menu, select your target Windows installation (if applicable), then check Safe boot and select Network, as shown in [Image A] . Once done, click OK—you’ll be prompted to restart, but you can ignore this for now (click ‘Exit without restart’) if you’re not yet ready to reboot.