50 WAYS TO WORK FASTER
The best way to achieve more is to work smarter, which is why we’ve put together 50 productivity tips based on our editors’ and readers’ advice

© ISTOCK / GETTY IMAGES PLUS/INDIGO MAKING STUDIO
BE MORE PRODUCTIVE, they say. Work smarter. Do five days’ work in the space of four! Now, we’re not suggesting that this article is going to shave two hours from your working day, but even if you find two tips out of these 50 that make a difference, we think that’s worth celebrating.
Never has been this subject been more topical, either. On the one hand, we have generative AI tools popping up all over the place that promise the world— even if that world has six fingers and dresses the Pope in a white puffer jacket. As we will see, there are practical ways to take advantage right now.
On the other hand, companies such as Adobe and Microsoft are desperate to keep you subscribing to their software. To do so, they continually update their software with extra tools, many of which (as you will see) can shave a few minutes from a task, or automate it all together.
ADOBE LIGHTROOM CLASSIC
QUICKLY SELECT PEOPLE
If you’ve taken a portrait, it’s easy to select the person without having to brush around them first. Open the image in the Develop panel, and then select the Masking tools, which are found by clicking on the circular icon under the histogram. You should see small circular thumbnails of any people in your image in the right-hand pane. Click on them, and the red mask highlighter will appear over the person in the image.
That should open a sub-menu that allows you to mask only certain body parts, such as hair, teeth, face, skin, or lips. Select the appropriate body part or the entire person, then click Create Mask. Now, you can make isolated adjustments to exposure, colors, saturation, and so forth to get the desired effect.
BRIGHTEN SKIES WITH EASE
Once again, open your landscape image in Develop mode and click on the Masking tools. This time, select the Sky button from the righthand pane. Once the sky has been selected, you can adjust the temp, tint, and hue settings until your dull gray sky is a more pleasing blue.
The advantage of using the Sky mask tool rather than brushes is that the selection is accurate, even picking out the sky in the gaps between the bridge rails in our photo, so you don’t end up with parts of the image being wrongly colored or having to spend ages fine-tuning the mask.
CONTENT-AWARE REMOVAL OF STRAY OBJECTS
If you have a stray crisp packet on a beach or a distracting interloper in a landscape, you can swiftly brush them out of history. In the Develop mode, click on the sticking plaster tool in the right-hand pane, and make sure content-aware removal is selected at the top of the pane that opens—it’s the icon that looks like an eraser.
Now, brush over the part of the image you wish to vanish away, using the mouse scroll wheel to adjust the size of the brush, if necessary. When you’re done, Lightroom should hopefully have removed the miscreant and filled in the background with something suitable.
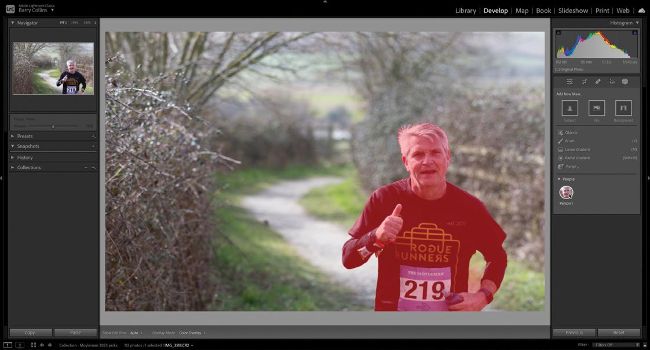
It’s now much easier to select people in an image in Lightroom.
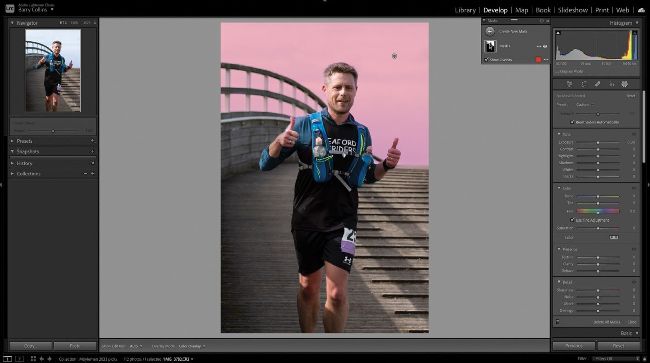
Change the color of the sky using Develop mode.
© ADOBE
AUTOMATIC PEOPLE TAGGING
Automatic people tagging makes finding people in a big library easier. In the Library panel, press “O” on your keyboard to enter People mode. You should now be presented with a sea of thumbnails showing the faces of anyone in the open picture folder or collection. Lightroom does a pretty good job of matching faces, batching together all the pictures containing a particular person. Enter the person’s name beneath their thumbnail, and not only will all the pictures in that folder/collection be appropriately tagged, but Lightroom will attempt to identify that same person in other folders/ collections, too.
LENS CORRECT ON IMPORT
Lightroom now applies automatic lens correction for modern mirrorless cameras, but doesn’t for older DSLR models.
To have all of your images lens-corrected in one hit, you can create a preset that does this at import. Launch Lightroom with the Develop panel open on an image to which you’ve already applied lens correction, and then click Develop | New Preset from the application dropdown menu. Select the option to Check None and reselect the options you want under Lens Correction (such as chromatic aberration and enable profile corrections). Now, call this preset “Lens correction”, and click Create.