COVER FEATURE
Stop Wasting Your USB STICK!
You can use your USB stick to do so much more than move files between PCs. Robert Irvine explains 14 superb new ways to get the most from its storage and transfer speeds
USB sticks have shrunk in physical size as they’ve grown in capacity. That’s probably why nobody calls them ‘thumb drives’ any more –‘half-your-little-finger drives’ would be more accurate. However, it’s not just the tiny size of USB sticks that makes them easy to overlook. Many of us buy them to transfer files from one computer to another, then leave these versatile portable devices languishing in a drawer.
Even if you regularly plug in your USB stick, you probably use only a fraction of its available storage. With the latest drives offering capacities of up to 2TB and super-fast USB 3.2 connectivity, there’s a lot of storage space and speed potential going to waste. What’s more, USB sticks are now cheaper than ever – you can buy a 128GB model from Amazon for less than a tenner – so it’s a shame not to make the most of these handy little devices.
In this feature, we reveal 14 new ways to unlock the full potential of your USB stick, so you can use it for much more than transporting files. We provide step-by-step instructions for useful tasks such as booting a free portable version of Windows 11, locking your PC with a USB security key and running a powerful AI chatbot from your portable drive. Some tips require you to reformat your stick, so ensure you back up your data first.
WHAT YOU CAN DO
• Run Windows 11 on any PC without overwriting Windows 10
• Switch easily between multiple versions of Linux
• Test new software safely in a USB-stick sandbox
• Create an emergency rescue kit to fix a malfunctioning PC
• Scan for malware threats using cloud-based AI
• Carry a powerful AI assistant in your pocket
• Stream music and videos from a media server
• Store passwords securely in a portable vault
TRY NEW OPERATING SYSTEMS & SOFTWARE
1
Boot a portable version of Windows 11
There are several benefits to creating a bootable version of Windows 11 on a USB stick. You can run the operating system on your current PC without overwriting Windows 10 (until you’re ready), use it to access your files and software on other PCs, and potentially bypass Microsoft’s restrictions for upgrading to Windows 11.
The latest ISO file for Windows 11 is 5.7GB in size, so you need a USB stick with a capacity of at least 16GB. An 8GB drive may have enough storage for the ISO, but you need extra space for boot files, Windows updates and any files and programs you add and download to the bootable version of the operating system. Newer USB sticks with speedy connectivity (USB 3.0 or later) will ensure the portable OS runs almost as smoothly as it would on your main hard drive.
To download the Windows 11 ISO, go to Microsoft’s Download Windows 11 page (www.snipca.com/55673). In the ‘Download Windows 11 Disk Image (ISO)’ section, select ‘Windows 11 multi-edition ISO’ in the dropdown menu and click Download Now. Once your request has been verified, choose English International as the product language and click Confirm. Click ‘64-bit Download’ to save the ISO file to your PC.
To make this version of Windows 11 bootable, download and run the brilliant free program Rufus (www.snipca. com/55674). Insert your USB stick and click Select ( 1 in our screenshot above right). Open the ISO file you downloaded, choose Windows To Go in the ‘Image option’ menu 2 and click Start 3 .
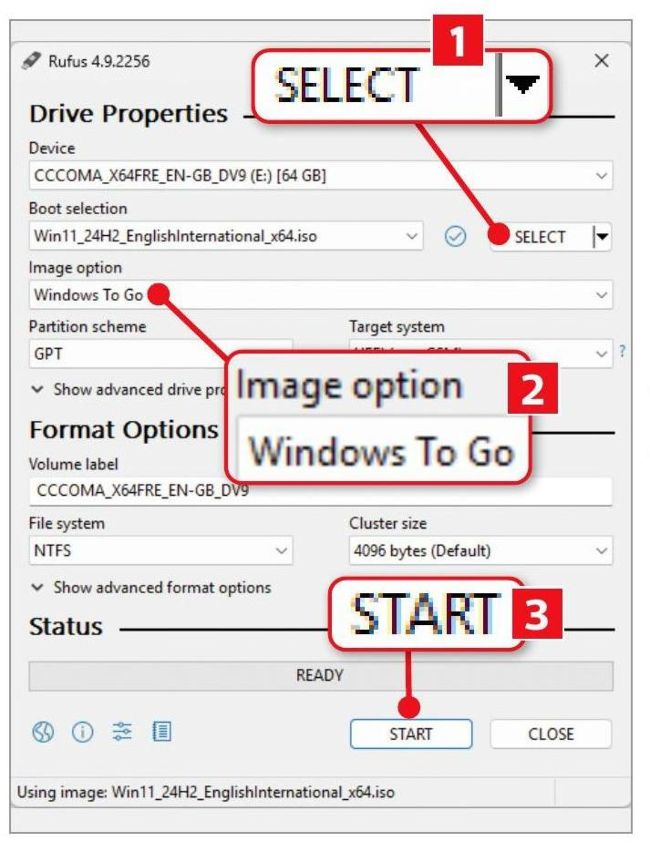
Use Rufus to create a bootable version of Windows 11 on a USB stick
Select the version of Windows you want to install and, in the Windows User Experience box that opens, ensure you tick the option ‘Prevent Windows To Go from accessing internal disks’ (see screenshot above right). This will stop you overwriting Windows 10 or your current installation of Windows 11. You can also remove the requirement for an online Microsoft account and use a local one instead.
If you want to upgrade an unsupported Windows 10 PC, rather than create a portable version of Windows 11, choose ‘Standard Windows installation’ in the ‘Image option’ menu. Select ‘Remove requirement for 4GB+ RAM, Secure Boot and TPM 2.0’ in the Windows User Experience box. We’ll explain more about this upgrade method in our upcoming ‘Windows 10 survival guide’ (out on Wednesday 10 September).