CAMERA CLINIC
Master the art of modern photography
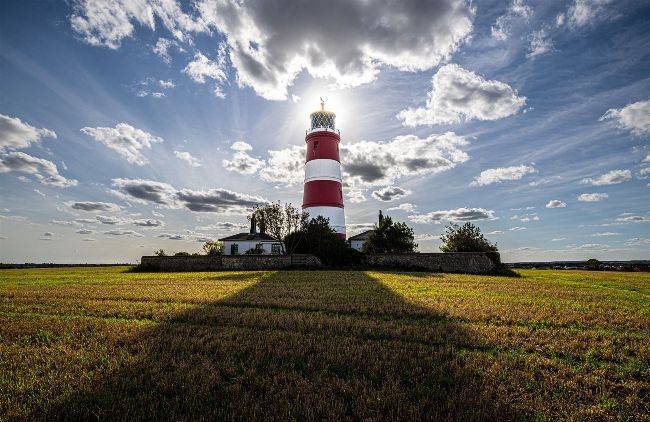
For some extra impact in your photographs, try shooting into the light.
Will Cheung
This month: Shooting into the light
Add drama and impact to your photos with the contre-jour technique
Will Cheung
An imaging journalist and freelance photographer based in London, Cheung has a wealth of experience over several decades. www.williamcheung.co.uk
In the early days of photography, having the sun behind your back and over your shoulder made perfect sense. You had even light, avoided flare and reduced the risk of underexposure, so it was a safe technique. The trouble is, while frontal lighting is perfectly sensible and the advice is still valid today, it gives dull, flat photos and squinting people when the sun is strong. Whether you call it contre-jour (against daylight), into the light, against the light or backlighting, shooting towards the light source is guaranteed to add drama, energy and spice to your shots. A word of warning. Our biggest light source is the sun and it must be treated with the utmost respect. You should never look directly at the sun through any optical device, even through strong neutral density filters, as it could cause irreparable eye damage. Use Live View on DSLRs or the rear monitor on mirrorless cameras to compose and focus your shot even when the sun is low on the horizon. As far as your sensor’s health is concerned, there shouldn’t be an issue with the brief exposures needed when you have the sun in the frame, but don’t make long exposures because the heat generated could harm the sensor.
Whereas shooting with the sun over your shoulder is easy from an exposure perspective – even a meter with a basic centre-weighted or average metering pattern can turn in accurate results – facing the light is a different matter. The brightness, whether it’s from the sun, a streetlight or even a white wall, can easily impact the meter reading, resulting in a photo that’s vastly different from your anticipated result. Learning how to react to different lighting scenarios and using the camera’s abilities to achieve the result you want is what this month’s Camera Clinic is all about, so let’s get straight into it...
Get the knowledge
Shooting into the light works well for most subjects
The literal meaning of the word photography is ‘drawing with light’. Frontal light is readily handled by camera meters and you can often point and shoot but spin round 180° and it is a different proposition. You need to think more about the outcome and how you will use the light, then use the camera’s exposure features to help. Of course, getting an exposure that makes the most of the scene can be challenging, but that’s the fun of contre-jour shooting.
A key step in shooting backlit pictures is recognising what does and what doesn’t work. Rim lighting, intense highlights and deep shadows can look wonderful but don’t assume that every shot will benefit from this look. As always, practice makes perfect and with digital there’s no cost when you go wrong.
Taking control of challenging light
Three essential camera features for expert contre-jour photography
THE SPOT METER
Cameras have several methods of measuring light. Most often, you will use multi-pattern metering but if you want to dig further into exposure technique for better results, engage the spot meter, which takes a light reading from a small area of the scene, usually indicated by a circular frame in the viewfinder. Some cameras have a highlight spot meter, which aims to retain detail in intensely bright areas.