GIMP
More fun with layers and masks
Karsten Günther reveals how GIMP manages layers, what the different types are and how to use masks for subtle effects.
OUR EXPERT
Karsten Günther is not only a master of using layers and masks to edit photos, but he also finds them useful to keep warm and incognito.
Besides selections, layers are one of the most important elements when creating complex B images. GIMP is no different. Being familiar with layers also helps if there seems to be an error – often a different layer is active from the intended one.
Normally, we can think of layers as transparencies, slides or printouts stacked on top of each other. The viewer looks at the stack from above and sees what is still visible after covering it. In fact, layers are much more complex objects, as will become apparent.
The Layer Dock represents this stack of layers in a list. All layers present in an image appear there with their name – for transparent layers it is displayed in normal font, for opaque ones it’s in bold – in the current order. All text layers, for example, are transparent, but other layers can be given this property by adding an alpha channel. If the eraser or cutting or deleting removes image material from such a layer, these areas become transparent. With non-transparent layers, the current background colour appears. Transparent layers do not necessarily need to have transparent areas.
GIMP uses layers for various purposes. Special parts of an image, such as text, are automatically created on a separate layer. It is still common practice to duplicate layers before editing, such as blurring – as a backup – in order to be able to access the original image data at a later time. Then an area of the image is processed, possibly in different variants, which are temporarily stored on different layers.
Part Two!
Don’t miss next issue, subscribe on page 16!
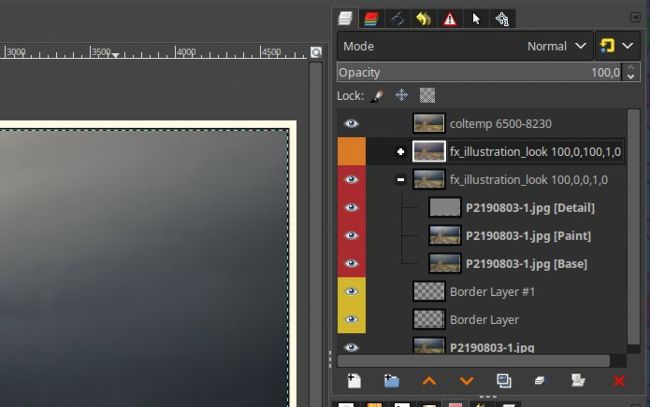
Lots of layers in one image are not rare but the rule. The Layer dock shows the connections and enables you to adjust multiple aspects.
Layers are therefore mainly used to edit parts of an image. This is true even if an entire layer is duplicated and offset against the copy via a layer mode. Layer modes have no counterpart in the physical world; they are part of the magic of image editing.
LAYER MODES
Layer modes are essentially an offsetting or rendering rule of the RGB values of the pixels in two neighbouring visible layers. The layer mode of the upper layer determines how the pixel values are offset against the layer below. GIMP then displays the result of this calculation. The outcome often looks rather strange, but it can be extremely useful. For example, the positions of layers can be checked to make sure they are pixel perfect with the Grain Extract mode, where any deviations clearly stand out. The subject is covered in detail in the GIMP manual at https://docs.gimp.org/2.10/en_GB/gimpconcepts-layer-modes.html, including the formulas used for offsetting.
In practice, it is often helpful to place your mouse cursor over the Mode button and then use the mouse wheel to try out all the different modes in turn. However, a lot of modes have very strong effects, so they tend to only be used on layers that have reduced opacity.
A typical application of layer modes is to darken or lighten highlights and shadows. To lighten dark images, for example, the Screen mode is a good choice. It has the effect that dark areas are lightened much more than light areas, which corresponds to how the human eye perceives things. You can see GIMP’s Screen layer mode in action in the screenshot (above-right). In some situations, the Addition and Dodge modes can also be helpful. Several copies of a layer can be superimposed to intensify the effect.
For images that are too bright, the Overlay and Multiplication layer modes, along with the different Light modes (Soft, Hard, Vivid), should be tried.