IT WILL TAKE 10 minutes
YOU WILL LEARN
How to use AI to improve complexions, add impact to eyes and create a soft focus background
YOU’LL NEED Luminar Neo, macOS 10.14.6
People are one of the most common photographic subjects. To reflect this fact, Luminar Neo (£67, from skylum.com) has an Edit workspace that provides a comprehensive collection of portrait-enhancing tools.
Traditionally, portrait retouchers using apps such as Lightroom Classic would deploy brush-based tools to manually target and tweak the colours and tones of features, such as eyes and skin. Thanks to its Machine Learning (ML) component, Luminar Neo enables you to retouch portraits more quickly.
Luminar Neo can recognise that a person is in the picture, enabling it to automatically blur their background to create a flattering bokeh without you needing to spend lots of time making a manual selection. The app also recognises the components of a face so you can instantly adjust the properties of the subject’s eyes, mouth and even eyebrows by dragging sliders. Again, no manual selections are required to target specific parts of the face. We’ll show you how to put the most useful portrait-enhancing tools through their AI-assisted paces.
George
Cairns
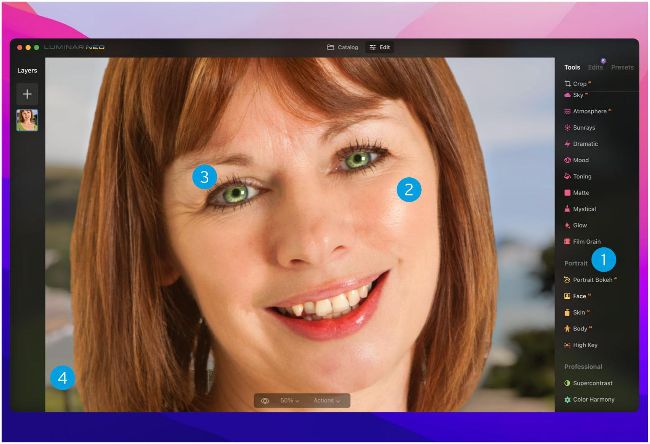
Image credit: Skylum Software
EXPLAINED… The Luminar Neo Edit workspace
1 Portrait tools
The Portrait section is packed full of AI-assisted tools to help you adjust a host of properties.
2 Perfect skin
Reduce the presence of shiny hotspots and erase wrinkles for a younger complexion.
3 Eye enhance
Add specular sparkle and even change your subject’s eye colour, without the hassle of coloured contact lenses.
4 Bokeh
Automatically select and blur the background to create a DSLR style bokeh that draws attention to the person.
HOW TO Use AI tools to refine your portraits
1 Blur background
In the Catalog panel, click the Add Photos button. Browse to select a portrait. Click the Edit icon. In the Tools panel scroll down and click on Portrait Bokeh AI. Drag the Amount slider to 100 to blur the background.
2 Fine-tune edges
Go to Brush Control. If there are any bits of background that still need to be blurred click Defocus. A red mask indicates the sharp areas. Spray to remove any traces of the red mask that overlap the background.
3 Tweak background
Toggle open the Background section. You can drag the Depth Correction slider to the left to blur closer objects, such as the fence. Tweak the Edges Correction slider for a better blend between blurred and sharp pixels.
4 The eyes have it
Open the Face panel. Set Iris Visibility to 100. We’ve set the Iris option to Green so the eyes match the colour of our subject’s green top. Set Iris Flare to 74 to add some shiny specular reflection that helps to bring the eyes to life.
5 Luscious lips
Scroll down to the Mouth section. Here you can drag sliders to give the lips more impact by increasing the value of the Lips Saturation and Lips Redness. Set Teeth Whitening to 60 for a winning, brighter smile.
6 Perfect skin
A burst of flash has bounced off our subject’s skin, creating shiny hotspots. In the Skin section, set the Amount to 50 and drag Shine Removal to 100. By ticking Skin Effects Removal, we can remove some spots and blemishes.
7 Erase blemishes
To create even smoother skin and turn back time, toggle open the Erase panel. Choose a small Brush Radius such as 10. Spray over any ‘crow’s feet’ around the eyes and any remaining spots and blemishes. Click Erase.
8 Before and after
Below the image is an eye-shaped icon. Click and hold on it to see the original, unedited version of the photo. Unclick to see the edited version. We’ve created a composite screenshot so you can see both at once.
9 Revisit edits
Any changes that you’ve made to the portrait are non-destructive. You can fine-tune or remove adjustments by clicking on the Edits panel. Here we’ve toggled open the Face section and changed the eye colour to Honey.